Mountain bikes are fascinating machines, aren’t they? You can ride them on the roughest terrains and enjoy the thrill. But being a mountain biker, I have always had the itch to take things to the next level. How did I do that? Great question! I installed a motor. And I love the extra power I get from the torque.
It even gives you the extra kick you might need to climb steep hills! Wait! There’s even more. Installing the motor does not change your bike’s handling capabilities. Isn’t that cool?
Now that I have got your attention, Do you want to learn how to attach a motor to your mountain bike? Let’s get started!
How To Put Motor In A Mountain Bike In 8 Steps!
You will have to follow some steps but first! You are going to need some tools.
Step 1: The Necessary Preparation

Tools
For any kind of process related to bikes, whether it is maintenance/repairs or installing a motor, you will need some necessary tools. Here are the necessary tools that you should have at your disposal.
- Hex Keys and Allen Wrenches (Make Sure That You Have Different Sizes Of These Tools)
- Pliers (Regular and Needle-Nose Are Recommended)
- Screwdriver (Philips and Flathead Are Recommended)
- Bike Conversion Kit
- An Adjustable Wrench
- Socket Set
- A Chain Tool
- Tire Levers
- Wire Cutters AKA Strippers
- Multimeter (Optional): Use This To Test The Electrical Connection
- A Bike Repair Stand (Optional)
- Thread Locker
- Thread Locker Fluid
- Sprocket
- Drive Chain
- Drill
- Torque Wrench
- Protective Clothing ( Gears, Masks, Gloves)
Set Up Your Workspace
Okay, so you are going to need a quiet place to work where you won’t be disturbed. Whatever place works for you like your garage, driveway, or anywhere else. Just keep the kids away!
Use A Bike Repair Stand Or Not
Should you use a bike repair stand for this whole operation? Honestly, it’s your own choice. The stand will help you keep your bike in one place as you install the motor.
Related: How To Choose The Right Bike Work Stand For Your Bike Repair Needs
Prepare Your Mountain Bike
Like I said, having the bike in a vertical position is necessary. Any elevated platform will do the trick. Another important step here is to spare a front caliper tire. This will be necessary to stop the mountain bike when needed.
During this type of operation, there is a higher risk of getting a punctured tire increase. To avoid that, disconnect the inner tubes from your setup and use a tubeless setup. Or you can just go with puncture-resistant tires. Whatever works for you!

Step 2: Select The Motor First
You cannot start the process without having the right motor first, can you?
Some of my preferred choices are Brose Drive S-Mag: 90Nm/567W and Shimano EP8: 85Nm. Your preference can be different. But while deciding on a motor, consider the following
- How much torque do you need?
- What kind of terrain will you ride on?
- Do you need a gas or an electric power motor?
A gas-powered mountain bike will be powerful but gas is expensive. On the other hand, electric-powered mountain bikes are powerful, cost-effective, and they also help protect the environment.
Step 3: Check Motor and Battery Compatibility
Always crosscheck between the motor that you have selected and your bike. If you have selected the battery as per the compatibility then it should work without any problems. Here are some things that you should consider, just in case!

| Step | What You Need To Do | Details |
|---|---|---|
| 1 | Motor Selection | Choose a motor that fits perfectly on your mountain bike frame. Consider minimal drilling requirements. |
| 2 | Frame Adjustment | If the selected motor doesn’t fit, make necessary adjustments to the bike frame. Install a new bracket on the top and bottom tubes or use a strap system for downhill cycling. Ensure a snug and comfortable fit. |
| 3 | Sprocket Installation | Install rear sprockets to support the new engine. Attach the rear sprocket carefully to the main powerhouse of the engine, providing the necessary power to the wheel. Pay attention to both front and rear sprockets. |
If you’re looking to upgrade your cycling experience, check out our guide on motorized bicycles.
Step 4: Now Install The Drive Chain
The drive chain transfers the torque from the motor to the rear wheels of the bike. Since the bicycle wheel is critical, you need to make sure that everything is done exactly like it should be. We need to protect the drivetrain from any damage. For that, let’s add thread lockers on the loosened bolts. The loosened bolts can damage the drive chain as you ride. Add some thread locker fluid to your bolts and that won’t be happening.
Remember, you have to install the drive chain in a straight line. This will ensure proper torque transition and also protect the drive chain from the motor’s pressure. Once you are done, put your bike on the ground and see if any chains or wires drop out. If you see any, just tighten them into their place.
Is your bike’s front derailleur not shifting properly? Check out our step-by-step guide on how to adjust your bike’s front derailleur and get back to smooth shifting.
Step 5: Install The Motor
And now finally, It is time to install the motor. Start by disconnecting the original wheel, and have your motor at the ready. Attach the new motor with the wheel and attach it to the bike. You’ll need an extra set of hands for this step.
Here, your brakes might loosen when you take the wheel off. You can use calipers to align and tighten the mechanical brakes. In the case of hydraulic brakes, you will also have to pump the brake lever.
Having problems putting the wheel back on? Here’s what you need to do:
- Unhook any kind of attachments to the wheel, this also includes the chain
- Hold the frame, this is very necessary for the back wheel. This is a two-person job. Now, pull the derailleur backward. You will hear a click that will signal the unlocking of the rear wheel.
- Remove the brake pads. You can use pliers for that.
- Now remove the wheel. You can fit the battery on any wheel. You will also have to open the cantilever brake, sometimes the rim is also enough.
- Operate the quick-release lever. This will open up the wheel properly.
- When you are done, place the bike on the floor. The bike seat should touch the ground.
Are electric mountain bikes worth the investment? Read our article on if electric bikes should be illegal and how they can benefit you.
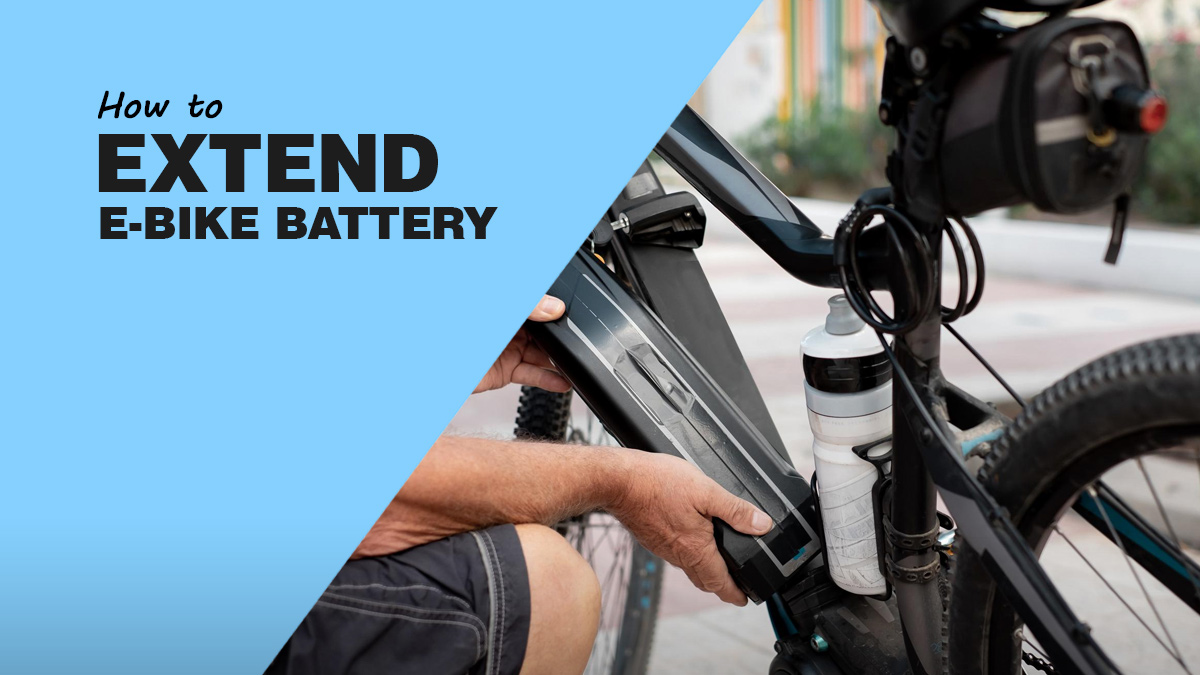
Step 6: Install The Battery
You will need to plug the battery into the connectors that you have already attached to the wheels, sounds easy right?
The speed gauge connector will be connected to the battery for all of this to work out. They will connect to the throttle, and make sure to have the pliers at the ready.
Having trouble shifting gears on your bike? Check out our guide on why your bike won’t shift gears and how to fix it.
Protecting The Battery
Having a battery box will protect the battery from rain and general wear and tear. You will need a drilling machine to attach the box. I’d recommend going for a small and lightweight box that doesn’t increase the weight of the bike. The box will be placed where you put your water bottle.
Step 7: Time To Re-Assemble The Bike
Make sure that the spark plug, bicycle engine, and bicycle chain are all in place. Reattach the wheels. Go with the rear wheel first, since you have attached the motor and battery to it.
Your bike handlebar and stem might also need some adjustments. If you want a more aggressive riding position, adjust the handlebar and stem accordingly. Doing so will give you more control and make your mountain bike even more balanced than before.
Still confused? Well, read our guide on how to install bike tires to learn the tips and tricks.
Step 8: Test Drive!
Here’s where the real fun begins. Now bring down your bicycle and make sure everything is in place. Be careful the first time around. Go slow. Check how far your bike goes the first time around and then take it from there.
Engage the motor, this is necessary to build up the torque. Now press the clutch to connect with the motor. You should be good to go now!

8 Things To Consider Before Installing A Motor
Well, there are some things that you need to consider before you install a motor on your bike.
1. The Motor Power and Cost
You need to consider the motor power and the overall cost. I’d recommend getting a powerful motor. Don’t go below a motor that has 750 watts of power. Powerful batteries deliver an efficient ride and are durable. You also have to consider the overall cost. Plan your finances accordingly. If you are going for a powerful and efficient motor, I suggest that you have at least $1000 to spare. You need to consider the cost of the motor, the charging kit, the battery, and other components. It’s good to also have a plan for the maintenance and replacement of parts.
Looking for a mountain bike that’s easy to store and transport? Check out our list of the best folding mountain bikes on the market.
2. Motor Compatibility
You have found the perfect mountain bike and the perfect motor/battery, but what if they are not even compatible with each other? How will you make that work out?
That’s why I recommend that you make sure that the bike and motor are compatible. You can always consult a professional for help.

3. A Powerful Braking System
A motorized mountain bike will need powerful brakes to bring a balanced experience. You need to go with electric bike-specific brakes that are powerful enough to bring your bike to a halt in a heartbeat. Another benefit of powerful brakes is that they will hold your bike and not make it fall apart every time you bring the bike to a halt.
Is your electric bike not working? Check out our guide on how to troubleshoot a dead electric bike and fix common issues.
4. Check Your Local Laws and Regulations
Before installing a motor on your mountain bike, make sure to check with your local authorities to see if this is even permitted. Although you will rarely come across any regulations, I still advise you to check with them anyway. Class 2 Electric Bikes are always permitted. Things get a bit tricky with Class 3 Electric Bikes but there are still workarounds for that.
5. The Battery Life and Range
The motor and battery go hand-in-hand, you won’t be able to use a motorized mountain bike without the battery. So, before you install the battery, consider its life and range. The battery should give you a range of 55+ miles on a full charge. The battery should also have the option to be quickly charged. So do consider getting a fast charger.
In my experience, lithium-ion batteries are best for motor-assisted bikes. You might be tempted to try out a bigger battery for your mountain bike, they are very powerful but also heavy. Having them installed will only restrict you from longer travel.
Curious about the benefits of electric bikes? Read our article on how they can improve your health, save you money, and reduce your carbon footprint.
6. The Weight Distribution
Since you will be adding a motor to your bike, the weight distribution will now be changed. This might affect the performance of the bike.
The best approach over here is to make sure that the weight of the motor that you have installed is evenly distributed. If one area of the bike is stressed more than usual then that will create problems for you.
7. Choosing A Rugged Wheelset
Another aspect that is ignored by a lot of people, you need to invest in a rugged and durable wheelset. Pay attention to your hubs, tires, and spokes. A motor-assisted mountain bike puts a lot of pressure on a wheelset. This is why you need the best wheelset!
8. The Need For Regular Maintenance
Just like any kind of electric bike or regular bike, you will need maintenance. Always make sure that your bike is maintained and working properly before every ride. Have the tools ready, and don’t forget to lubricate the chain!
Related: Three Basic Bike Maintenance Tips You Can Do Yourself
The Pros And Cons Of Putting A Motor On Your Mountain Bike
| Aspect | Pros | Cons |
|---|---|---|
| Convenience | Riding becomes more convenient, with increased speed and climbing capability. Exercise becomes more efficient. | Cost of installing a motor, potential maintenance expenses, and replacement part costs. |
| Lifespan | The bike’s lifespan is increased as motor assistance reduces wear and tear on components. | Increased weight due to the motor, potentially affecting the bike’s agility and responsiveness. |
| Adventures | Allows for longer adventures without getting tired, thanks to the assistance of the motor and a powerful battery. | Reduced form of exercise, as the effort required, is significantly decreased. |
Build A Motorized Bike At Home
Since you can now install a motor on a mountain bike, you might want to try your skills on other bikes as well. Watch this fun video on how you can build an amazing motorized bike at home.
FAQs
Can I Put A Motor On My Mountain Bike?
It is possible to install any kind of motor on your mountain bike, you could go with a gas-powered or an electric-powered motor.
How Fast Is A 100cc Motor?
These motors are very fast, the average speed of 100cc motors ranges from 55 to 75 mph. There are also some exceptional motors that have broken the record at 116mph.
Which Bike Motor Is Best In The Long-Run?
You can choose between a gas-powered or an electric-powered motor. Although electric motors are mostly preferred in the long run because of their benefits and affordability.
Recap
Congratulations! You have done it! Just one important thing I will mention here is that it is better to have two sets of hands rather than one while installing a motor on your mountain bike. You’ll need some extra help. Hopefully, going through this guide has given you enough knowledge to go along with the process. Do you have any questions? Please let me know in the comments below!
Also Read
- Top 10 Best Electric Road Bikes
- Electric Bike Popularity Soars: Top States Leading The Charge Revealed In New Study
- How To Select The Best Mountain Bike Tires And Rims
- How To Install Hybrid Tires On A Mountain Bike: Can You Actually Use Them?