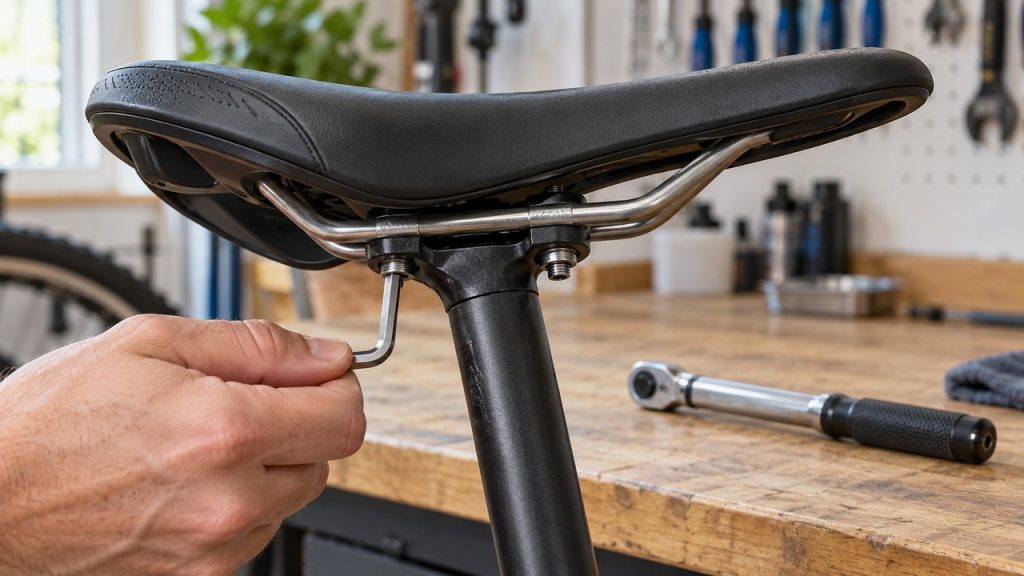
A bike seat that keeps tilting back has a saddle clamp that has lost its grip on the rails or on its own cradle. Start with four causes: the bolt is under its torque spec, the clamp’s teeth have worn smooth, grease sits where the clamp needs friction, or the rails don’t match the clamp’s shape. Find your clamp type in the table below, check those four in order, and tighten to the number printed on the seatpost or in its manual.
Cranking the bolt harder won’t restore worn teeth, and Selle Italia warns that going past its torque limits may jeopardize the saddle’s safety. If the whole post slides down or swivels instead, the seat collar is loose; see the collar section below.
Why the seat tilts back and not forward
You sit behind the point where the clamp holds the rails. Every bump pushes down on the back of the saddle and levers the nose up around that point. On single-bolt and old-style clamps, only the clamp’s grip on the cradle, the rails and the toothed faces holds the angle against that lever. When that grip gives, the saddle rotates in the direction your weight pushes it: tail down, nose up.
Clamps with one bolt ahead of the post and one behind it resist this better because the bolts set the angle. Park Tool describes the design: to tilt the nose up you loosen the front bolt and tighten the rear, and the reverse to tilt it down. Park doesn’t say the next part, but it follows from that method and is Icebike’s reasoning: if loosening the front bolt lets the nose rise, the front bolt is what holds the nose down against your weight. The accepted answer to this question on Bicycles Stack Exchange describes the same thing (“one bolt pulls the nose down”), and lists three options for a single-bolt clamp: more torque, more friction from carbon assembly paste, or a two-bolt post.
Check that the clamp moved
Before you take anything apart, put a strip of tape or a marker line across the joint between the saddle clamp and the seatpost head, and a second mark on each rail where it leaves the clamp. Ride for a day. If the marks have split apart, the clamp is slipping. If the marks line up and the saddle still feels tilted, look elsewhere:
- Sprung saddles and suspension seatposts sag under your weight and return when you stand. That is suspension travel. Set the preload or spring to your weight using the maker’s manual.
- Bent rails after a crash leave the saddle crooked while the clamp holds firm. Replace the saddle.
Seat slides down or swivels? That is the collar

If the saddle drops lower or points sideways, tighten the collar bolt to the torque printed on it, or close the quick-release lever with firm hand pressure. Park Tool notes that seatposts need only minimal tightening to stop slipping down, and Ritchey caps collar torque on its carbon posts at 6 Nm.
Which clamp do I have?
Turn the bike so you can see under the saddle and match what you see to a row. The torque column gives figures from manufacturer manuals and Park Tool’s published chart. Use the number printed on your own seatpost head or in its manual when you have one; these figures show the range, not your bike’s spec. Our bike torque spec finder gives the same split (5-12 Nm for a modern seatpost head, 15-20 Nm for an old-style clamp) and converts Nm to inch-pounds.
| Clamp type | How to recognize it | Why it slips back | Fix | Typical torque (source) |
|---|---|---|---|---|
| Separate clamp on a straight post (“candle” or old-style clamp) | A plain tube post that narrows at the top, with a clamp slid over it. One bolt or nut runs side to side through toothed side plates or washers. Budget bikes and older bikes. | The knurling on the side plates or washers wears smooth, the nuts were never tight, or the post isn’t pushed all the way into the clamp. | Seat the post all the way into the clamp, set the angle so the teeth mesh on fresh teeth, tighten both nuts in turn. Replace the clamp if the knurling is smooth. | 15-20 Nm (Park Tool, for clamps without a maker spec) |
| Single horizontal bolt on a toothed cradle | One bolt runs side to side through the post head. The cradle sits on a ridged or toothed arc. | The cradle’s teeth wear smooth, or the bolt is under spec. | Clean the teeth, check them for wear, retorque. Replace the cradle or the post if the teeth are worn. | 15-20 Nm for old-style single horizontal bolts (Park Tool) |
| Single vertical bolt (one-bolt “micro-adjust”) | One bolt points up through the head into a top plate. The rails sit between two plates that rotate on a curved base. | One bolt holds the angle by friction alone. Grease on the curved faces, or worn ridges, lets it rotate. | Clean the curved faces dry unless the maker says otherwise, check for wear, retorque. If it still slips clean and at spec, switch to a two-bolt post. | Printed on the head; on carbon rails, never above the saddle’s limit |
| Two bolts, front and rear (inline) | Two bolts on the head, one ahead of the seatpost and one behind it. | The front bolt has backed off or was never at spec (Icebike’s reasoning from Park Tool’s method), or the rails slipped in the jaws. | Set the angle by loosening one bolt and tightening the other, then torque both evenly. | Paul: 10.1 Nm |
| Two bolts side by side | Two bolts across the head, one on each side of the rails, with no bolt ahead of or behind the post. | Like a single-bolt head, it holds the angle by clamp grip: bolts under spec, grease on the faces, worn ridges or the wrong rail size. | Clean the faces, check for wear and rail size, bring both bolts up to spec together. | Printed on the head or in the manual |
| Head with a separate angle screw | One or two clamp bolts plus a small screw that sets the angle. | Clamp bolts under spec. | Loosen the clamp bolts, set the angle with the screw, retorque the clamp bolts. | Printed on the head or in the manual |
| Any clamp with oval carbon rails | Rails are carbon and taller than they are wide, such as 7×9, 7×10 or 8×8.5 mm. | A clamp cut for 7 mm round rails touches an oval rail at the wrong points. | Fit the clamp kit for that rail size, or a post whose clamp lists it. | Lower of the post spec and the saddle’s limit. Selle Italia: 8 Nm max on carbon rails |
| Dropper post head | A post with a remote lever on the bars. | Same causes as the matching rigid head above. | Follow the row for the head design. For drops, sag or play, see our dropper post fixes. | Printed on the head or in the dropper manual |
Two rules sit on top of every row. Selle Italia tells riders to follow the seatpost maker’s torque but never to exceed 8 Nm on carbon rails or 15 Nm on metal rails, so the lower of the two numbers wins. A Selle Italia saddle with metal rails in an old-style clamp gets 15 Nm, the bottom of Park Tool’s 15-20 Nm range. Second, bolt size changes the spec within one brand: Park Tool’s chart lists Truvativ rail clamps at 22-24 Nm with an M8 bolt and 6-7.1 Nm with an M6 bolt. Use the figure for your own head.
Fix a seat that keeps tilting: the checklist

You need the right hex key or wrench, a torque wrench that reads in the range from the table, a rag, grease for the bolt threads, and a phone with a level app.
- Record the position. Measure saddle height from the collar, the distance from the saddle nose to the center of the bars, and the saddle angle with a phone level. Park Tool recommends all three so you can put the saddle back where it was.
- Identify the clamp from the table above, and look for a torque figure printed on the head.
- Loosen the clamp and lift the saddle out, or open the clamp far enough to see every contact face. Take a photo of the part order before you remove anything.
- Inspect the teeth. Run a fingernail across the toothed faces on the cradle, the side plates or washers, or the curved base. Sharp ridges pass. Rounded or shiny-smooth teeth fail. A clamp that rotates without clicking through steps has worn teeth or knurling.
- Inspect for cracks and damage. Check the cradle, the top plate and the bolt threads. A crack anywhere, or threads that spin without tightening, means new parts.
- Check rail size. Look for a size such as 7×9, 7×10 or 8×8.5 mm printed on the rails, or check the saddle maker’s spec, and match it to the clamp. Park Tool notes that standard rails are 7 mm round and 42 mm apart.
- Clean. Wipe the rails, cradle and toothed faces with a clean rag. Grease the bolt threads only, unless your post’s manual says otherwise.
- Refit inside the rail marks. Clamp the rails between the limit marks printed on them. Park Tool and Selle Italia both say not to clamp outside them, and Selle Italia warns that a saddle moved beyond them will break.
- Set the angle to the reading you recorded in step 1, with the bolts snug but not tight.
- Torque the bolts to spec with a torque wrench. On a two-bolt head, bring both up in small steps so neither bolt ends far ahead of the other.
- Pull test. Park Tool’s check: grab the front and back of the saddle and pull up, down and side to side with force. Nothing should move.
- Ride and recheck after your first ride, with the tape marks from earlier in place.
Skip steps 4 to 7 only if the tape marks showed no movement and you are just resetting the angle.
Fixes by clamp type
Budget and older bikes: the separate clamp

Sheldon Brown’s glossary describes the posts on older and cheaper bikes as plain pipes, often 7/8 in (22.2 mm) at the top, with a separate clamp that holds the saddle. The clamp has a bolt or a threaded rod with a nut on each side, and the angle is held by toothed plates or washers whose knurling meshes like gears.
First check that the post sits all the way into the clamp. Sixthreezero’s guide for its bikes says the post has to go all the way down to a small V-shaped tab on the clamp, or it “will never clamp properly.” Then loosen the nuts until the plates separate, rock the saddle to the angle you want, and push the plates together so the teeth seat in new valleys. Tighten the two nuts in turn: Sixthreezero says you should see thread showing past both nuts, because a nut left short of full thread engagement can strip. Park Tool says most of these clamps have no maker spec and gives 15-20 Nm as a safe range. If the knurling is rounded off, replace the clamp, matched to the post’s top diameter.
Single-bolt heads

A single-bolt head that slips at the right torque has a friction problem. Clean the curved faces or toothed cradle with a dry rag, check the teeth, and retorque. Specs vary by design: Ritchey’s WCS Carbon 1-Bolt, which uses Ritchey’s SideBinder clamp, lists 12 Nm as the maximum, while Park Tool gives 15-20 Nm for old-style single horizontal bolts. Check the figure printed on your head.
If you have retorqued a clean, unworn single-bolt clamp with the right rail kit and it still creeps back, switch to a post with front and rear bolts, where (by Icebike’s reasoning from Park Tool’s method) the front bolt holds the nose down.
Two-bolt heads

On a post with one bolt ahead of the post and one behind it, Park Tool’s method is to loosen one bolt and tighten the other by the same amount: loosen the front and tighten the rear to raise the nose, or the reverse to drop it. Working back from that method (our reasoning, not Park’s words), a saddle that has tilted back points to a front bolt that backed off or was never at spec. The rails can also slip in the jaws, so check the tape marks on the rails too. Reset the angle, then bring both bolts up to spec together. Chromag’s guide for its two-bolt post says: “Make sure both bolts are evenly torqued.”
Paul’s post, with front and rear clamp screws, takes 10.1 Nm (90 in-lb), and Paul adds a limit on angle: the upper clamps must stay parallel to the saddle rails.
Heads with two bolts side by side follow other rules. Neither bolt sits ahead of the post, so the angle depends on clamp grip, as on a single-bolt head. Treat a slipping side-by-side head with the single-bolt fixes above, and bring both bolts up together.
Two more two-bolt figures, with the bolt layout not stated in either source: SR Suntour’s 2009 manual for its SP8 NCX suspension seatpost gives 12 Nm with a 5 mm key, and Park Tool’s chart lists Syncros heads at 5 Nm per bolt.
Other causes that make the clamp lose grip
Grease in the wrong place
Park Tool tells you to wipe all parts clean and to follow the seatpost maker’s advice on grease or thread prep. Grease on the cradle faces, the rails or the toothed plates lowers the friction that holds the angle. Paul and Chromag do suggest light grease on clamp contact surfaces to cure creaks on their alloy posts, so the manual decides. On a clamp that is already slipping back, wipe those faces dry unless the manual says to grease them.
Wrong rail size
Park Tool notes that carbon rails may be oval, 7×9 mm or 7×10 mm, and need a post made for them; Ritchey also lists 8×8.5 mm rails. Ritchey’s clamp identification sheet tells riders to use the correct clamp size for each saddle “or you may experience slippage,” and lists separate kits for its carbon posts (ridged faces) and alloy posts (smooth faces). Thomson ships its Elite post with a 7×7 clampset and sells a 7×10 set for oval carbon rails. If the slipping started after you swapped a saddle, check this first.
Saddle slides back along its rails
If the angle holds but the saddle creeps backward on its rails, the rail tape mark shows it. The causes match the tilt causes: a bolt under spec, a rail profile the clamp wasn’t made for (Ritchey’s “or you may experience slippage” applies here too), or grease on the rails and jaws. The fix is the same checklist: clean the rails and jaws, confirm the rail size, set the position inside the rail limit marks, and torque to spec.
Stripped threads and cracks
A bolt that keeps turning and never reaches its torque has stripped threads on the bolt or in the clamp; replace whichever part is damaged. Check each clamp piece for hairline cracks, and look hardest around the bolt holes. Replace a cracked clamp.
Carbon posts and carbon rails
Use a torque wrench on every carbon clamp. Park Tool recommends one for saddle clamps in general, and a carbon post or rail leaves you less room for error. Then:
- Use the lower of the two numbers: the post’s spec and the saddle’s limit. Selle Italia’s ceiling for carbon rails is 8 Nm.
- Match the clamp to the rail profile. A 7×9, 7×10 or 8×8.5 mm rail needs the matching clamp kit.
- Use carbon assembly paste (a grease with fine grit that adds friction) on the clamp faces only if the post maker allows it. Ritchey calls for it on the shaft of its carbon posts, where the post meets the frame.
- Check for cracks and crushed fibers on the rails where the clamp sits every time you remove the saddle.
If a carbon setup slips at full spec with the right clamp kit, stop at the spec. Ask the post maker, or switch to a post with a two-bolt head.
Forum fixes: sandpaper and inner tube
Forum threads suggest wrapping the rails in sandpaper or strips of old inner tube before you tighten the clamp. None of the instructions we checked for this page (Park Tool, Ritchey, Paul, Chromag, SR Suntour, Selle Italia) mention putting anything between the rails and the clamp, and Park Tool and Selle Italia both ask you to match the clamp to the rail’s shape. Our advice: if a clamp needs a wrap to hold, it is worn or the wrong size, so replace it.
Repair or replace?
- Retorque only if the teeth are sharp, nothing is cracked, the rails match the clamp, and the tape test shows the bolt was loose.
- Replace the clamp or cradle if the teeth are worn, a plate is cracked, or the rail size is wrong. Ritchey and Thomson sell clamp kits for their posts, and separate clamps for straight posts are sold on their own.
- Replace the seatpost if the worn teeth are machined into the post head itself, the head is cracked, the bolt threads in the head are stripped, or a single-bolt head keeps slipping when clean, unworn and at spec.
- Replace the saddle if the rails are bent, cracked or crushed where the clamp sits.
After the fix: set your position
With the clamp fixed, check the saddle position. Use the saddle height calculator for a starting height, then follow our guide to adjusting bike seat height. For fore-aft position and reach, see how to fit a bike. If the saddle itself is the problem, our guide to finding a comfortable bike seat covers shapes and widths.
Sources
- Park Tool, How to Adjust a Bike Saddle and Seatpost (2024): two-bolt tandem adjustment, pull test, 15-20 Nm for old-style single horizontal bolts.
- Park Tool, How to Remove and Install a Bike Saddle (2024): 7 mm rails 42 mm apart, oval 7×9 and 7×10 carbon rails, rail limit marks, 15-20 Nm for non-integrated clamps.
- Park Tool, Torque Specifications and Concepts: seat rail binder values for Syncros and Truvativ.
- Ritchey, WCS Carbon 1-Bolt Seatpost specifications: saddle clamp 12 Nm max, clamp kits for 7×7, 7×10 and 8×8.5 mm rails.
- Ritchey, 1-Bolt Seatpost Clamp ID (PDF).
- Ritchey, Carbon Seatpost Installation Guide (PDF).
- Paul Component Engineering, Seatpost instructions (PDF): 10.1 Nm (90 in-lb).
- Chromag, Seatpost User Guide.
- SR Suntour, SP8 NCX / SP8 NEX seatpost owner’s manual (PDF): saddle bolts 12 Nm.
- Selle Italia, Warranty and instructions: 8 Nm carbon rails, 15 Nm metal rails, rail limit marks.
- Thomson, Elite Seatpost: 7×7 clampset standard, 7×10 clampset for oval carbon rails.
- Sheldon Brown, Bicycle Glossary: Seatpost.
- Sixthreezero, How to Fix a Loose or Wobbly Bike Seat: seat the post to the clamp’s V-shaped tab, tighten both nuts until thread shows past each.