Bike Tire Inflation Troubleshooting: This guide was refreshed on May 27, 2026 with a stronger answer-first section, a practical decision table, and related Icebike links so riders can diagnose the issue faster.
Start With the Pump and Valve Before Blaming the Tire
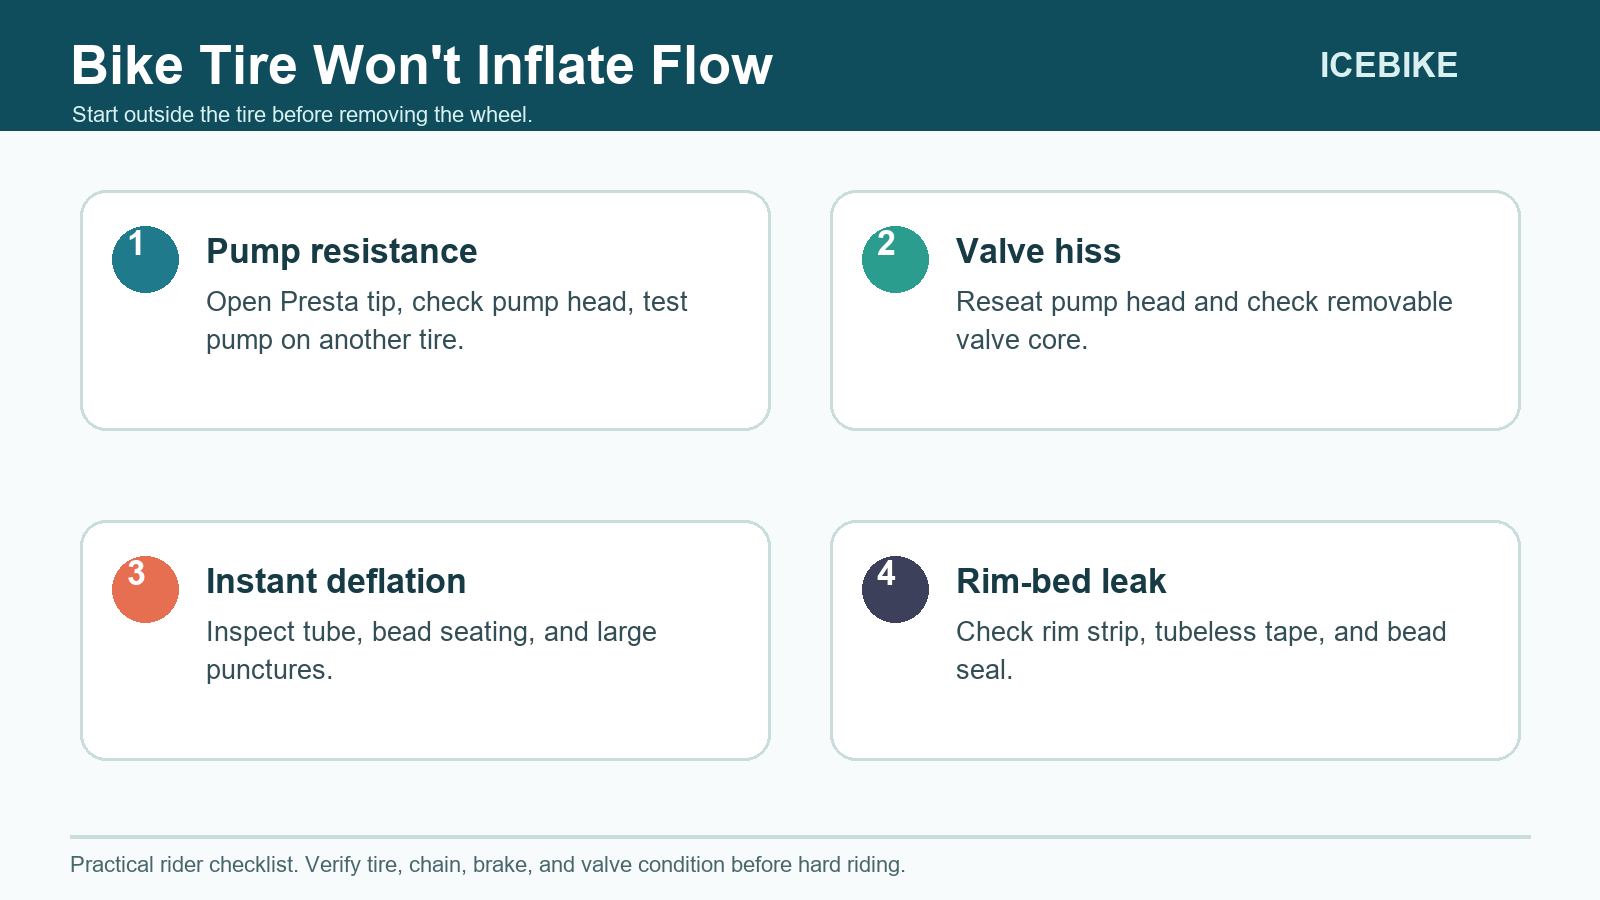
When a bike tire will not inflate, the fastest diagnosis starts outside the tire. Check that the pump head matches the valve, the Presta tip is open, the valve core is tight, and air is not escaping around the pump seal before removing the wheel.
| What happens | Most likely area | Next move |
|---|---|---|
| Pump has heavy resistance | Closed Presta valve, stuck core, or blocked pump head | Open/tap the valve and test the pump on another tire. |
| Air hisses at the valve | Pump seal or loose valve core | Reseat the pump head and tighten removable core if needed. |
| Tire inflates then instantly empties | Tube tear, bead issue, or large puncture | Remove the tire and inspect before riding. |
| Air leaks near the rim bed | Rim tape, tubeless tape, or bead seat | Inspect the rim strip/tape and tire bead. |
For safer follow-up, use how to check tire pressure, pressure loss checks, and repeated tire pop diagnosis.
One thing all of us cyclists dread is a tire that won’t inflate. It certainly can put a dread on our plans. The most common reason for a tire that won’t inflate is a puncture. There are many sharp objects, especially when you ride off-road. So, the first thing that you need to do if your bicycle tire won’t inflate is Check For A Puncture. The second thing to look at is your Pump Connection.
A puncture can lead to either a low leak or a rapid deflation. This is often the first thing to check when your tire won’t inflate. Trust me, given my hours of off-road riding, I have had to deal with plenty of these.
Nevertheless, whatever the reason, there might be a quick fix possible if it is not too late.
What To Do If Your Tire Won’t Inflate
Here is what I always do when my bicycle tire won’t inflate. I perform this routine as a mantra, as a matter of fact, it is my personal checklist. It helps me find out if it is too late to save the tire or if it will suffice. Follow these steps if your bicycle tire won’t inflate:
1. Check The Pump Connection And Type

First, make sure that you have the right pump according to your valve type. The main reason your tire won’t inflate can be a faulty pump connection. It is possible that you have not connected it properly, especially if you are new to this. Remember that the connection between your pump head and your tire valve must be straight and tight to ensure that your pump is properly attached properly.
A faulty pump connection will backpressure. That’s why the tire will not receive any air. Don’t let a flat tire ruin your ride! Learn how to use a bike pump like a pro
2. Confirm Your Valve Type
You will either have a Presta or a Schrader valve. If you do not know the difference between the two, don’t worry. A Presta valve is slim and it has a relatively small cap on the top. A Schrader valve is like the valves seen on car tires. You can only ensure you have connected the pump successfully when you use the right pump head for your valve.
Here are some most common reasons why your bike tires keep losing air!
3. Check If There Is Blockage In Your Valve

A dirty valve will not let any air pass through. Dirt and debris can easily block your valve, preventing any inflation. Examine your valve for any dust and dirt particles. Clean the valve opening and see if you can pump air.
4. Try Changing Your Pump
Have you considered trying a different pump? Maybe the fault is in your pump. You can borrow a different pump. If your pump is not in good working condition, it will not effectively pump air.
5. Properly Position The Valve Stem
Test your valve stem. Make sure to check if it is fully upright or not. If your valve stem is pushed or bent it will not assist in proper inflation. If your valve stem is not in the correct position, gently pull it up until it is in its proper position.
6. Inspect For Damages
First, inspect for any visible damages. Look at your valve, do you see any cracks or tears? Also, inspect your tire tubes. Look for any puncture there might be. If your valve is damaged or there is a puncture in your tire tube, there will be an air leak. Don’t settle for less! Check out our top-rated bike tubes
If there is no visible damage, move on to the next step.
7. Listen While Inflating
If there is no visible damage, pay close attention while inflating. Listen for any hissing sound. This sound is an indicator of air leakage. Put your finger around the valve to feel for any escaping air.
If you have tubeless tires, here is the right method to inflate tubeless tires.
8. Repair Your Valve Or Tube
If there is any damage to your valve or tube, you will have to repair it in order for it to work properly. You can either use a patch kit to repair any small punctures. But if you anticipate that the damage is beyond repair you will have to look for replacements.
9. Take Help From A Professional
If your tire still won’t inflate, seek professional help. You can visit a local bike shop and get a professional mechanic to assess your issue. They will be able to provide you with an exact solution to your problem.
10. Avoid Using The Wrong DIYs
As I already said, a DIY is not a long-term solution. You cannot rely on it for longer periods because it can be dangerous and can cause more harm to your bike. There are many quick fixes, but do not replace proper repairs with them.
11. Don’t Forget Tire Inspection

Many of us don’t inspect the tires with the attention that we should, and some of us don’t inspect at all. If there are cracks in your tire or if it’s punctured, how are you going to inflate it?
Get back on the road in no time with our guide to installing bike tires
11. Don’t Speed The Pump Connection Process
Many inflation problems are because the pump is not connected properly. If there is a bent or the pump is not tight enough, it leads to air leaks.
12. Never Neglect The Valve
I made this mistake myself when I was new to riding. I performed zero valve maintenance and it led to a lot of debris being accumulated in the valve. It compressed the air flow and I was not able to inflate the tire at all.
Don’t let your bike tires expire! Learn how to store them properly and when to replace them.
Bicycle Tire Inflating Checklist
Here is a checklist that I have developed that you can follow while you are inflating your bicycle tire. Tick off the steps you have completed to make sure you don’t miss anything
| No. | Task | Description | Done |
|---|---|---|---|
| 1 | Select the Right Pump | Choose a pump compatible with your valve type (Presta or Schrader). | [ ] |
| 2 | Check Pump Connection | Attach the pump head securely, ensuring it’s straight and tight on the valve. | [ ] |
| 3 | Confirm Valve Type | Identify your valve type (Presta or Schrader) and use the appropriate pump head. | [ ] |
| 4 | Check Valve for Debris | Inspect the valve for dirt or debris that might obstruct airflow. | [ ] |
| 5 | Inspect Tire and Tube | Visually examine the tire and tube for punctures, cracks, or damage. | [ ] |
| 6 | Position Valve Stem | Ensure the valve stem is upright and not bent for proper inflation. | [ ] |
| 7 | Check Pressure | Set desired PSI on pump gauge based on recommended tire pressure. | [ ] |
| 8 | Attach Pump Head | Firmly connect the pump head to the valve, aligning it properly. | [ ] |
| 9 | Inflate Tire | Begin pumping air into the tire using consistent strokes. | [ ] |
| 10 | Monitor Gauge | Keep an eye on the pressure gauge to avoid over-inflation. Stop when the desired pressure is reached. | [ ] |
| 11 | Listen for Hissing Sound | Listen for hissing sounds indicating potential air leaks. | [ ] |
| 12 | Feel for Escaping Air | Gently place a finger around the valve and base to detect air escaping. | [ ] |
| 13 | Check Valve Seal | Ensure the valve-to-rim seal is secure and airtight. | [ ] |
| 14 | Remove Pump Head | Gently detach the pump head from the valve once inflation is complete. | [ ] |
| 15 | Inspect Tire Again | Double-check the tire for bulges or uneven pressure distribution. | [ ] |
| 16 | Secure Valve Cap | Replace the valve cap to prevent dirt and debris from entering. | [ ] |
| 17 | Check Pressure Again | Reassess tire pressure using a separate pressure gauge for accuracy. | [ ] |
| 18 | Repeat for Other Tires | If necessary, repeat the inflation process for other tires. Maintain uniform pressure. | [ ] |
Don’t let bike jargon confuse you! Check out our guide to bike anatomy
Bike Tire Types And Recommended PSI
Here is a pound per square inch (psi) chart that you can follow while you inflate your bike tire:
| Bike Tire Type | Recommended PSI Range | Tip |
|---|---|---|
| Kids’ bike tires | 20–40 PSI | Lower PSI gives comfort and stability |
| Narrow tires/road bikes | 80–130 PSI | Higher PSI supports reduced rolling resistance |
| Medium tires / hybrid bikes | 50–70 PSI | Provides a balance between comfort and performance |
| Thick tires/mountain bikes (off-road) | 30 PSI | Lower PSI gives better traction on rough terrain |
| Thick tires/mountain bikes (on-road) | 50 PSI | Higher PSI offers smoother on-road riding |
How To Properly Inflate Your Bicycle Tire
This easy-to-follow video is going to show you how to properly inflate your bicycle tire:
Don’t let low tire pressure slow you down! Check out our guide to road bike tire pressure
My DIY Fixes For A Tire That Won’t Inflate
Sometimes, when I need a quick fix just to be able to hop on the bike and get on with it, I use some DIY fixes that help me secure the valve stem and prevent any leaks while I inflate them. These fixes are just for temporary assistance until I can figure out what’s the underlying problem that I need to address.
Rubber Band Valve Lock Trick
What you are going to need for this hack is:
-
-
- A thick rubber band. (The thicker, the better)
- Pair of Scissors. You might need it for trimming the rubber band.
-
Here’s how it works:
-
-
- First, inflate your tube slightly before you attach the pump to make sure that the valve is in the normal position.
- Now slide the rubber onto the valve stem. Position it just below the valve cap.
- Now slowly and gently push the rubber band down until it tightly fixes against the rim. This helps keep the valve stem in the required upright position.
- Now attach the pump head to the valve. Try to make sure that the rubber band does not interfere with the connection.
- Now start inflating the tire. The rubber band will keep the valve stem steady. It will prevent any air leaks.
- Once you properly inflate the tire. Now, carefully remove the rubber band that we installed. Slide it upwards and carefully remove it from the valve stem.
-
2. Valve Stem Reinforcement with Electrical Tape Trick
This is my second go-to DIY hack. Here is what you are going to need:
-
-
- Electrical tape or any strong adherent tape
-
Here is what you are doing to do:
-
-
- Deflate your tire and remove the tube from your rim.
- Now cut an approximately 2-inch piece of the electrical tape.
- Around the stem base of the valve, wrap this electrical tape.
- Softly press this tape onto the rim. Make sure that it is securely attached and that it covers the whole area where the valve comes through.
- Now reinsert the tube and remount it onto your rim.
- Inflate your tire but keep an eye on the valve stem. The electrical tape strengthens the seal. It will prevent any air leaks from between the valve stem and the rim.
-
These quick fixes are not recommended for long rides and certainly not aggressive ones. Be sure not to use any DIY solution that will compromise your safety.
How To Practice Valve Care: My Weekly Routine
Valves are the most important thing when it comes to experiencing a smooth ride. At Icebike, all of us experts believe that going a little beyond the basics can help you avoid problems such as a bike tire that won’t inflate. That’s why, I decided to share with you my advanced valve care routine that can help you maintain your valves in a top-notch condition and avoid such problems. follow this step-by-step guide and you’ll be done in no time:
Tools That You’ll Need
-
-
- Soft Bristled Brush/ Toothbrush
- Cleaning Solution (Bike Specific)/ Mild Soap
- Valve Core Removing Tool
- Lint-Free Cloth
- Quality Bike Lubricant
-
Step 1
Begin by deflating your tire. Once you have deflated it remove it from the rim. Now carefully examine the valve and look for any dirt, dried sealant, or any other particles. Use a flashlight to examine the base of the valve, stem, and threads.
Step 2
Mix the cleaning solution or the soap, whichever you are using, with water. Now dip the brush in this mixture that you have created. Now gently scrub the valve thread, base, and the stem. Be very gentle so as to not damage the valve.
Once you are done scrubbing, use the cloth to dry the area and remove any soap water if there may be.
Step 3
Now you have to apply the lubricant. There are specific lubricants for bikes that don’t attract dirt. Take a small amount of lubricant and apply it to your valve. Be careful because it has to be evenly distributed. You can apply lubricant on the threads too if your valve is removable.
Step 4
Now you have to re-attach your valve if you removed it in the first place. Remember it has to be perfectly snug, not too loose, and neither too tight. If you did not remove your valve you can simply reinstall your tire onto the rim. Inflate it to the correct tire pressure. Pay close attention to any hissing sound which indicates there is a leak. Put your finger around the valve too to make sure that no sir is escaping.
Why Should You Do Valve Maintenance?
A clean valve makes sure that there is a secure seal so that no air leaks out of your tire. It can be really frustrating when you are trying to inflate your tire and the air doesn’t seem to pass. More than usually, it is because your valve is clogged. With proper maintenance, you can avoid this hassle.
Moreover, a well-maintained valve has a longer life span. Neglecting your valve will only lead to more troubles down the road. It will not only compromise the functions of your valve but also have a negative effect on effective inflation. This can even lead to frequent leaks. So take care of your valve because you will be investing in a trouble-free and smooth ride.
FAQs
How Do I Know If My Bike Tire Is Inflated Enough?
You can tell if your bike tire is inflated enough by listening to the sound it makes when rolling on the pavement. Properly inflated tires make a smooth sound that is consistent. On the other hand, an underinflated tire will make a thumping sound.
Do Tubeless Tires Go Flat?
Yes, tubeless tires can go flat due to a puncture. But the good news is that tubeless tire punctures are easier to fix and you can do it quickly even on a trail side.
Why Does A Bicycle Tyre Get Harder When You Pump It Up?
It is possible that your bicycle tire gets harder when you pump it up because of the increasing air pressure inside. It makes the tire firm and more resistant to deformation.
What Triggers Low Tire Pressure?
Rim damages, temperature changes, natural air loss, poor maintenance, tire aging, and manufacturing defects are all different reasons that can trigger low tire pressure.
Why Is My Bike Harder To Pedal?
There can be a lot of reasons why your bike is harder to pedal including low tire pressure, misaligned brakes or wheels, an issue with your gears, or even a worn chain or drivetrain.
Should Bike Tyres Be Rock-Hard?
No, your bike tires should not be rock-hard. You should inflate them to the recommended tire pressure that is mentioned on the tire sidewall for comfort and optimum performance.
Which Tyre Is Better Soft Or Hard?
Soft tires have a better grip and comfort while hard tires have a better rolling resistance and are more durable. The type of tire that will be better for you depends on your riding style and preference.
Conclusion
Although dealing with a bicycle tire that won’t inflate can be frustrating, there are some tips and tricks that you can apply to avoid this disaster. More often, the cause is right in front of us, like a puncture or a clogged valve, but we tend to overlook it due to ignorance.
The best fix is to never neglect your bike. Have you faced this problem recently? Let me know what you did in the comment section below! Happy Riding.
Also Read
- How Long Do Bike Tires Last
- How To Check Tire Pressure Without A Gauge – Bike Maintenance Tips
- Mountain Bike Tyre Pressure Calculator