Do you know what’s frustrating? When you are ready to hit the road but the bicycle just refuses to budge! What’s wrong with your bike? Why won’t it move? Well, the most common reason why your bike won’t pedal forward is because either your bike is Poorly Maintained or you have Rusted Crank Arms to the extent that they simply refuse to move. Or on the simpler side, your Chain has Slipped Off the gears because it was loose.
But you’re not alone in this conundrum. I have been stuck in this sticky situation more times than I would like to admit.

Why Your Bike Won’t Move Forward- Bicycle Diagnosis
Through my years of cycling, I have learned the common reasons why your bicycle can get stuck. With time, I have also learned solutions to these problems with some amazing DIY hacks that can come in handy. So let’s diagnose the problems and their solutions.
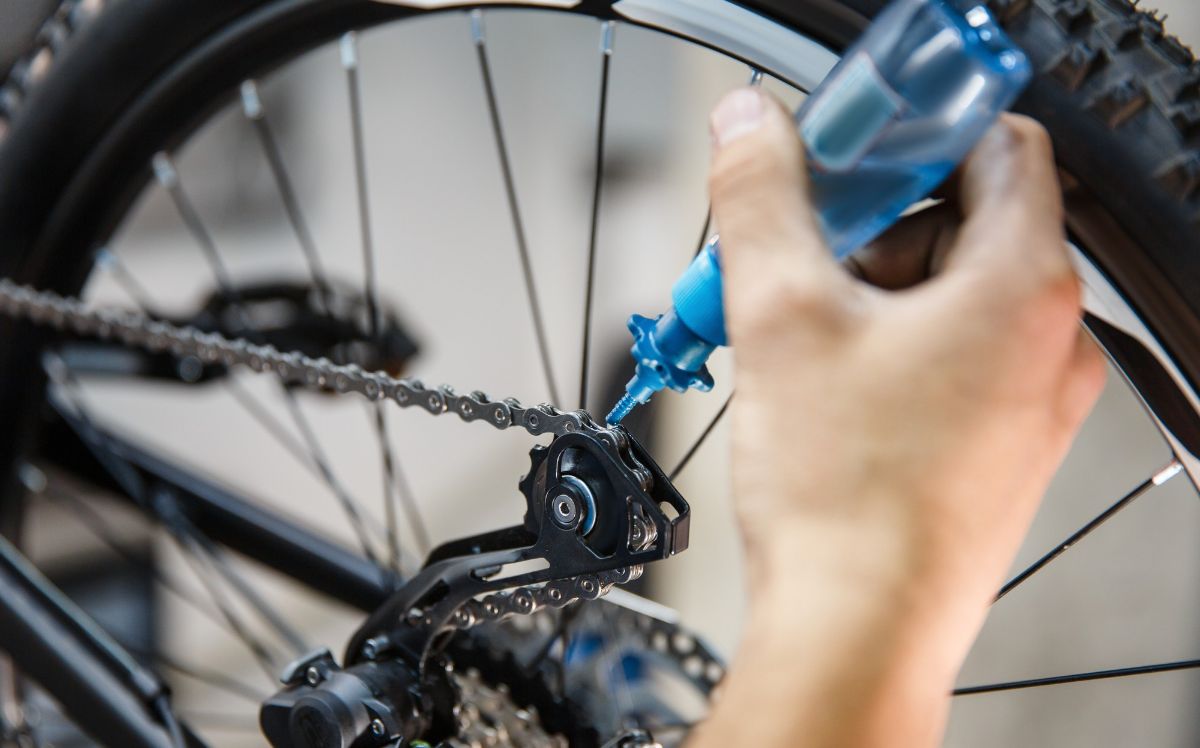
1. Rust Is Affecting The Chain And Pedal Crank Performance

Rust in your pedal crank makes it hard for the pedal to move. A rusty chain is when your bicycle chain has developed a layer of rust on the metal components. Rust will be visible on your chain links and rollers. A rusty chain is most of the time the culprit as to why your bike won’t move forward. But your bicycle will give you signs before completely giving up on you. Here’s what you should be looking for:
| Signs of Rust on Bicycle | Effects |
|---|---|
| Reduced Efficiency | When rust sets in, friction increases, making it harder for the chain to move over sprockets. This leads to decreased ride efficiency. |
| Noisy Ride | Rust can cause squeaking and annoying creaks, making the ride noisy and less pleasant. |
| Poor Shifting | Rust can result in a delay in shifting or difficulty in shifting into the desired gear. |
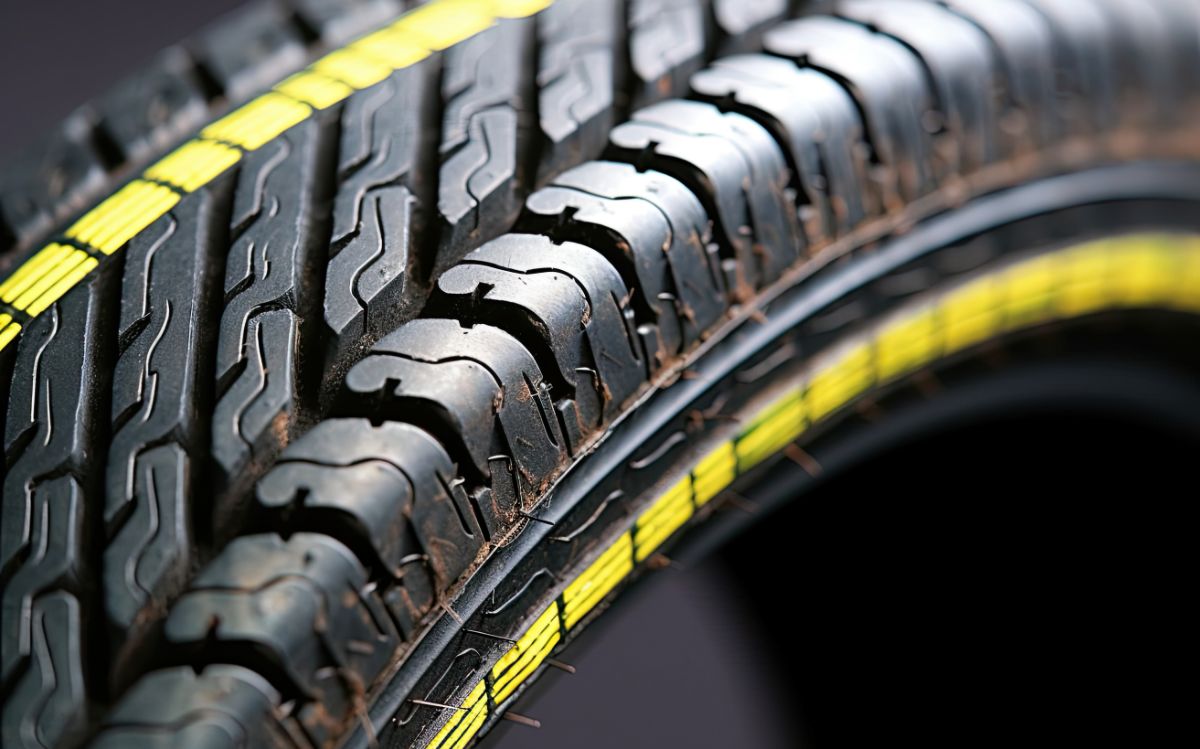
2. A Flat Tire Is Making It Hard To Pedal

Maybe your bicycle is not moving because you have a flat tire. It happens when the inner tube loses air leaving the tire deflated or flat. This situation can quickly escalate because apart from affecting a bike’s performance, it also has an impact on your safety. If you continue to ride your bike with a flat tire, it can damage your rim, tire, or even your inner tube. These repairs can be very costly.
Ridding with a flat tire requires much more effort than usual. You might feel that your bike is slow and in some cases it even becomes unresponsive.
Can You Ride A Bike With A Flat Tire? Give our article a read to find out.
3. An Improper Chain Tension Is Causing Power Loss

Improper chain tension means that your bicycle chain is either too tight or too loose. There will be power loss which results in a decreased pedaling efficiency. There will be more tension on the chain and drivetrain components, hence more wear and tear.
Most importantly, improper chain tension will give rise to different gear-shifting problems. Your gear might slip which will prevent your bike from moving at all.
Read our article on “Why You’re Cycling Slower in the Winter” to improve your winter cycling performance.
4. Gears Are Not In Sync With Gear Shifters
If you have a bicycle with gears, it is possible that the gears are not in sync with your gear shifters. This has happened to me multiple times. When this happens, climbing hills becomes a serious challenge. There is so much of an inconsistent gear change that the bike simply gives up.
Sometimes the gears even change unpredictably leading to discomfort while riding.
Discover the average bike speed to set realistic goals for your rides.
5. Brakes Are Causing Friction

There is a whole variety of problems when it comes to brakes. They can get stuck, not function properly, or even cause a lot of friction. Apart from not being able to stop when required, brake issues cause wear and tear on the brake pads and the rims. Resistance will be created from stuck brakes which makes it harder for the pedal to move.
So your brakes won’t release? Read our take on Bicycle Brakes Won’t Release. Common Problems And Easy Solutions
6. A Stuck Wheel Is Rubbing The Frame
A stuck wheel means that one, either the front wheel or the rear one, or both wheels become immobile. They will not rotate freely which can make it a challenge to maneuver the bike. It’s a serious problem especially when you are navigating obstacles or are on a difficult track.
There are many reasons behind a stuck wheel. The most common being a misaligned wheel. It will rub with the frame which prevents it from turning. Or you have bent or damaged axles. Other reasons to look into are issues with your bearings and hub. It might be just because debris or some foreign object is stuck between the wheel and the frame. This blocks the wheel from turning and your bike will not move forward.
Interested in starting cycling as an older adult? Check out our guide for helpful tips.
7. The Chain Lost Contact With Drivetrain
When your bicycle chain falls off the cassette or the chainrings, it will drop on your bottom bracket or crankset. Your bicycle will completely freeze and you will not be able to pedal it forward. When your chain falls, it completely loses any contact with the drivetrain components of the bike. This leads to a complete loss of propulsion. Your pedaling becomes ineffective because the chain now has no connection with the gears.
It happens because you have made a shifting error or there is an improper chain tension. A misaligned derailleur is also the reason why your chain might fall off. You need to immediately stop riding if this happens mid-ride because if you continue, you can damage your chainrings, derailleur, and your chain.
Got a loose bike chain? Here’s How To Tighten A Bike Chain in easy steps
8. There Is Traction In Your Tires
Sometimes your bike gets too hard to pedal because there is traction in your tires. You might be wondering if it is a good thing to have traction. Yes, it is but only on uneven terrains. The same traction that is helping you ride your bike on the rough tracks makes it difficult to pedal on smooth roads.
Let’s take a mountain bike, for example, there are knobby tires on all of these bikes. This design creates a rolling resistance when you are on pavement. Tire traction is also one of the reasons why you might find your bike sluggish or feel that it is difficult to ride on smooth surfaces.
9. You Have A Soft Suspension Setup
Suspension is often overlooked when it comes to looking for reasons why your bike won’t forward. Your suspension adjustment might be too soft and this leads to “Pedal Bob”. It is a phenomenon that occurs when your suspension system fails to absorb your pedaling input.
As a result, your bike will bounce when you pedal. This wastes your energy while making your pedaling less efficient. You end up feeling like you are pedaling on an unstable road.
10. You Are Applying The Wrong Pedaling Technique
If suspension is not your issue, you need to check your pedaling technique. To be sure, check your pedaling cadence. You will need to find your RPM (pedaling revolutions per minute). Usually, it should be around 80-100 RPM. If you are good here, check your pedal circles. Is your pedaling smooth and circular?
11. Maybe The Culprit Is You!
Hear me out! Genetics has a huge role to play when it comes to bicycling. Maybe you are not fit yet to ride on climbs or you don’t have the experience. Knowing your gears plays a huge role in affecting cycling. Using high gear when climbing only makes things difficult. Especially the new riders. Even some of the professional cyclists, including me, use lower gears on steep hills. You need to understand these basics before you begin doubting your bicycle!
What To Do When Your Bike Won’t Move Forward- Easy Solutions
For every problem, there is a solution if you address it timely. Along with solutions, there are some DIY hacks I have included to make things easier for you.
1. Solution For Rusty Chain

You will have to clean the rust chain. Start by cleaning the chain using a degreaser and a chain brush. Here is what you will have to do:
Steps
- Take a degreaser and apply it to the chain. Be generous.
- Take the chain brush or any old toothbrush and scrub the chain. Try to work the degreaser into the chain links.
- Now rinse the chain using clean water. Remove the degreaser and any dirt.
- Take a clean cloth and dry the chain properly.
Lubricate The Chain

Another solution is lubricating the chain. Take a high-quality chain lubricant, I use the Smoove chain lube and apply it on all of your chain. When you are doing this keep turning the pedal backwards. This will make sure that the lubricating penetrates generously between the chain rollers and links.
2. Solution For A Rusty Pedal Crank
It can be very challenging to deal with a rusty pedal crank. But you cannot keep riding with one because it affects the bike’s performance. To deal with a rusty pedal crank you are going to need:
- Adjustable Wrench
- Bike-Specific Degreaser
- Chain Brush
- Gloves
- Wire Brush
- Penetrating Oil
Steps
- I prefer to perform this cleaning outside because there is adequate lighting and good ventilation. Just make sure to find a stable surface.
- Put on your gloves to make sure you are safe from any chemicals.
- Remove your pedals if there is rust in the pedal spindles. It is always better to thoroughly the pedal assembly. So remove the pedal from the crank arms. You can do this using the adjustable wrench. Now turn the pedals counterclockwise. Your pedal will become loose and you can easily remove it.
- Take a good amount of the degreaser and apply it to the rusted areas on the pedal crank. Make sure that you cover all the rust spots.
- Using the chain brush scrub all the rusted areas. I use a stiff brush to work the degreaser in the rusted spots. It helps loosen the rust and any dirt.
- If the rust is very stubborn, you will have to use a wire brush or steel wool. But be careful not to use excessive force. You can damage your crank.
- Using a clean cloth, wipe off the loosened rust. Repeat the process until you are free from all that rust.
- Once you have removed all the dirt and rust, apply the lubricant. Don’t forget to lubricate the pedal threads and the spindle (if you removed the pedals).
- Before reinstalling your pedals, carefully examine the crank for any remaining rough spots. Reattach the pedals to the crank arms. Tightly secure them using the wrench. Remember that the right pedal tightens clockwise while the left pedal tightens counterclockwise.
Related:
- Learn how to confidently ride a bike as an adult with our comprehensive guide.
3. How Can You Fix A Flat Tire?

If you get a flat tire on the road, get away from the traffic and find a safe place to address the situation.
- If your rear tire is flat, you will need to shift your chain onto the smallest chainring and also the smallest rear cog.
- Open the brake quick release and remove your wheels from the fork dropouts.
- Now slightly inflate the tire. It will help you locate the puncture. Listen for any hissing sound. You can also feel for any escaping air. Once you have located the puncture, mark it so that you don’t lose it.
- You will either have to replace the inner tube or patch it up using a bike tire patch kit. It will depend on the size of the puncture. Only a hole of 4mm or less can be fixed with a patch kit.
- If you are installing a new tube, inflate it to your tire’s recommended pressure and then reassemble the tire onto your rim. Make sure that you properly seat the tire bead in the rim’s bead hook.
- Now check for any leaks. Listen for the hissing sound and feel for any escaping air. If not, you are ready to hit the road again.
4. Aligning The Gears Properly

Fixing Bicycle Gear Issues
For misaligned gears, begin by examining your gear cables. Look for any damage, fraying, or kinks. If yes, you will need to replace the gear cables. Most of the bikes have a barrel adjuster. You will find it on the derailleur or your shifters.
Barrel adjusters make it easier to make small adjustments to the cable. All you need to do is turn your barrel adjuster until the gear starts shifting smoothly. If you experience even after making these adjustments, take your bicycle to a local bike shop to get professional tuning.
5. Addressing The Brake Problems For A Smooth Ride

Start by inspecting your brake calipers. Look for any dirt, debris, or any other foreign object that might make the brakes stick. If yes, you will have to clean them. Now take a small amount of any bike-specific lubricant and apply it to the pivot points of the brake calipers.
Do not get any lubricant on the brake pads or your wheel rims. Changing worn-out brake pads might also solve your problem. Also, check the alignment. Your brake calipers should be correctly aligned with the wheel rims. If not, you will have to adjust them.
How To Adjust Brake Calipers
| Step | Instructions |
|---|---|
| 1. | Squeeze your brake lever to engage the brake caliper. |
| 2. | Check the alignment of the rims with the brake pads. Ensure that the brake pads make contact with the braking surface of the rim without touching the tire. |
| 3. | Locate the bolt points securing the brake caliper to the fork. Use a 5mm Allen wrench to loosen these bolts. |
| 4. | Squeeze the brake caliper while observing the brake pads. The caliper will start to center itself on the rim. Continue squeezing until the caliper is centered. |
| 5. | While maintaining even pressure on the brake lever, tighten the caliper bolts that were loosened in step 3. Periodically check the caliper’s position. |
| 6. | Check the pad clearance. There should be an even gap between the rim and the pads on both sides of the wheel. |
| 7. | Fine-tune pad alignment if needed. Use a 3mm Allen wrench to adjust the screws on the caliper’s arm sides individually. These adjustments affect the position of each brake pad. |
| 8. | Test the brakes by squeezing the brake lever. Ensure there is no rubbing or noise during the engagement. |
Find out how to safely ride a bike with a flat tire and avoid getting stranded.
6. Adjusting The Chain Tension
There will be specific guidelines in your bike’s manual on properly adjusting the chain tension. If your issue is an improper chain tension adjustment, check the chain tension. There should be a slight amount of slack. Generally, it should be half an inch of vertical movement. If not, adjust your chain adjustment. The proper measurements and the method to adjust each bike will be in the bike’s manual. Nevertheless, I usually follow this method:
7. Getting A Stuck Wheel To Rotate
Start by checking for misalignment. Look at your wheel’s position within the fork dropouts or your frame. Make sure that it is seated and properly aligned. If not, align them. Also, check your axles for any bends or damages. You will have to replace them.
If this is not your issue, move on to bearings and hubs. If they are damaged, there is nothing you can do except replace them. As I said, any debris stuck in the front wheel will restrict its movement. Remove any foreign objects to allow your wheel to rotate.
8. Putting The Chain Back On The Chainrings

Fixing a fallen chain might only take you a couple of minutes. When your chain falls, stop pedaling immediately. Shift to a safe location and examine your chain.
- Look for the reason why your chain fell. Keep an eye out for twists, kinks, or any tangled sections.
- Using your hand, guide the chain back onto your chain ring or cassette. You can also use a flat tool if you do not want to get your hands dirty.
- Also, look for any visible damage. If your chain is damaged, do not continue to ride.
- your chain might have fallen due to excessive slack. In this case, you will need to adjust the chain tension as described above.
- Test your bike. Gently pedal and see if the chain is engaging with your gear properly. If yes, you can not continue to enjoy your ride.
9. Make The Right Tire Choice
If you do not want to own multiple bikes for different kinds of riding needs, I would suggest using the right tire for the right surface. If it is interrupting your ride to the extent that you feel your bike is not moving, you can switch to tires that have a smooth tread pattern for when you ride on roads. Slick tires are famous for creating less rolling resistance. They can make pedaling on smooth surfaces easier.
10. Adjust Your Suspension Settings
To avoid the pedal bob, refer to your bike’s manual to adjust your bike’s suspension. You will find a setting to correct sag. There will also be a damping setting in the manual. You can adjust according to your riding style and your weight. A better way to adjust suspension, especially if you are new to cycling, is by referring to a bicycle mechanic. For this, you can visit any local bike shop.
11. Using The Right Pedal Technique
Think of pedaling as scrapping through the mud on your shoe’s bottom. You have to push through the downstroke and then smoothly glide into the upstroke. This is the most efficient technique to distribute the workload on your leg muscles evenly. Keep on practicing. This will help build muscle memory which makes your pedaling efficient.
12. Work On Your Fitness
Ride on different kinds of terrain as well as on hills to gain more experience. This will help you understand gears and how you can use them effectively. Also, combine different forms of exercise with regular cycling to improve your endurance level. Slowly work on your fitness. You will see a huge change in your cycling experience. It will slowly become more enjoyable!
FAQs
Why Is Your Bike So Hard To Pedal In The Morning?
Your bike is so hard to pedal in the morning because cooler temperatures cause the tire pressure to drop. The wrong tire pressure creates rolling resistance.
Why Is It Easier To Ride A Bike When It Is Moving Faster?
It is easier to ride a bike when it is moving faster because the bike’s momentum makes it easier to balance and control the bike. This reduces the efforts that you need to put in to maintain your bike’s stability.
How Do I Make My Bike Pedals Less Stiff?
Try adjusting the pedal tension. If this does not help you can also grease the bearing and see if your pedals become less stiff.
Is It Better To Pedal Harder Or Faster?
The normal pedaling cadence is 80-100 RPM. Try to maintain a balance between pedaling harder and faster.
Are Fat Bikes Hard To Pedal?
Yes, they are hard to pedal as compared to non-fat bikes.
Conclusion
These are the 11 most common reasons why your bike won’t move forward. Following these simple instructions for effective solutions can make it possible for you to ride your bike again! All it takes is cleaning the chain and the pedal, adjusting the tension, checking your brakes, and aligning your gears!
Remember to prioritize your safety before you begin addressing the situation. Reach out to me in the comments below if you have any problems while implementing these solutions.
Also Read: Signs Your Bicycle Is Too Big: Is Your Bike Oversized?