
Bike Spoke Tightening Guide: This page was significantly updated on May 27, 2026 with a fact-checked decision section, practical table, visual guide, and related Icebike links.
Tighten Spokes Only With Wheel Trueness in Mind
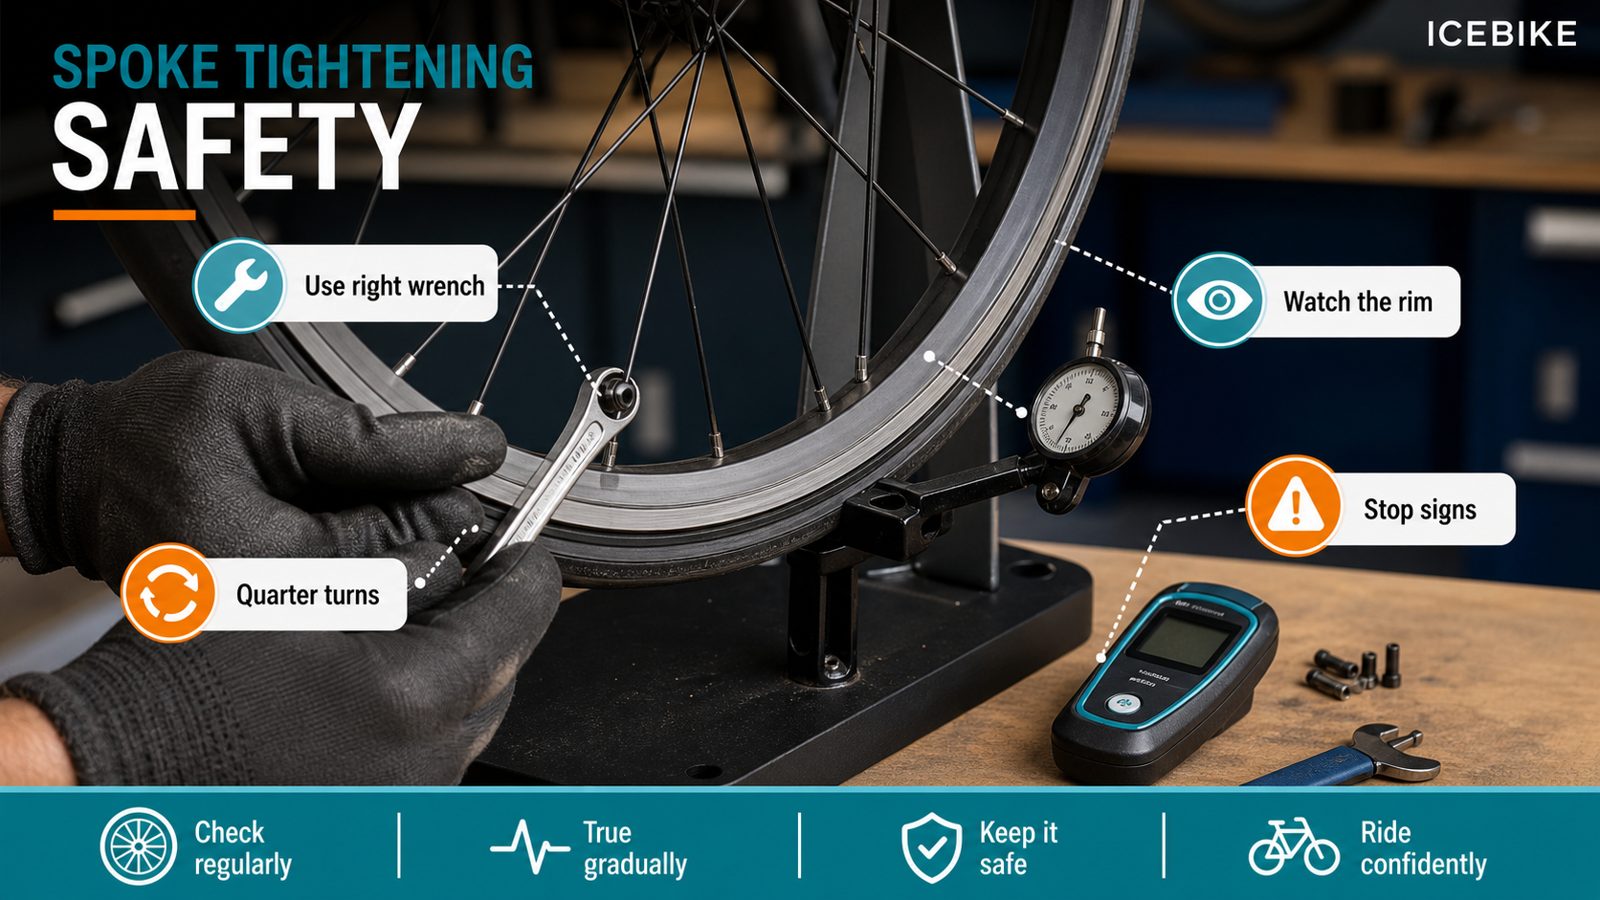
A spoke is not an isolated bolt. Tightening one nipple changes tension and pulls the rim, so random tightening can make a wheel worse. Identify loose spokes, check lateral and radial trueness, use the correct spoke wrench, and stop if the rim is bent or spokes are breaking.
| Wheel symptom | Likely issue | Safe next step |
|---|---|---|
| One loose spoke | Localized tension loss | Small adjustment, then recheck trueness. |
| Side-to-side wobble | Lateral truing needed | Adjust paired spokes gradually. |
| Hop or flat spot | Radial issue or damaged rim | Do not chase with random tension. |
| Repeated broken spokes | Wheel fatigue or poor tension balance | Professional rebuild/inspection. |
For related safety checks, see wheel size basics, 29-inch and 700c compatibility, and brake squeak diagnosis.
Have you recently experienced a bit wobbly ride? Does your bicycle also make weird noises when you are riding it? It’s not you, It’s your bicycle. The culprit? Your Bicycle Spokes! Sounds crazy right? Spokes are thin metal rods that connect your wheel hub with the rim. They are also in charge of providing strength and support for your bicycle wheel. I read a study in the journal Engineering Failure Analysis in 2014 that proved:
Bicycles that had more spokes absorbed shocks much better than bicycles that had fewer spokes.
With wear and tear, these spokes become somewhat loose. Or their tension division becomes unequal. What happens then? I am so glad you asked! When this happens, your wheel starts to wobble. You may even notice it rub against the brake pad. So how can you tighten your bike spokes to avoid this problem? Here’s the good part. I have simplified the steps to tighten the bike spokes so you can easily follow them!
What You Need To Know Before Adjusting Your Spokes

Before we dive into the technicalities, it is important to get familiar with the terms that will be used a lot. I definitely don’t want to leave you scratching your head by the time we reach the middle of the steps now, do we?
Bike Spokes
Those thin rods that connect your wheel and the rim are your bike spokes. I bet you already knew about this one, didn’t you?
Spoke Tension
Spoke tension is the pulling force that is applied along a spoke. This force pulls the hubs and rims towards one another.
The Spoke Nipple
The spoke nipple is that small piece of metal that you see at the end of each spoke. You use this nipple to make tension adjustments.
A Wrench
A wrench is an L-shaped or T-handled tool that you use to tighten or loosen the spokes.
Relative Tension
The difference between the two tensions of different spokes of the wheel.
The Dish
The amount of offset a rim has from the center of the hub.
Redial True
Aligning the rim from side to side
Lateral true
Aligning the rim from top to bottom.
Truing Stand
A truing stand is a tool with an axle stand on which you can place your wheel. It will allow the wheel to turn freely.
Tension Balancing
There might be some fluctuations in your spoken reading on one side. If you are noticing a wide fluctuation range, it will be better to do some tension balancing. Tension balancing is the process in which you increase the tension of one spoke and then decrease the tension of another on the same wheel.
This will help you achieve the same relative tension. A well-balanced wheel is key to increasing the life of your wheel spokes.
The Zone Of Influence
When you are checking the tension of your wheel spokes, you will find some outliers. Here, you will have to increase one spoke while you will have to decrease the other one. You will have to use your judgment about how increasing or decreasing will affect your wheel’s dish.
When you are tightening one spoke and then after one or two spokes you come across a spoke that you have to loosen, the relative area between the one you had to tighten and the one you had to lose, is called the zone of influence.
Learn about the different parts of your bike and how to troubleshoot.
You see, getting familiar with all these terms before we begin the process will help you understand it better. Let’s begin now, shall we?
Step By Step Guide To Tighten Spokes
First, you need to gather these tools.
Tension Adjustment- The Right Tools
Here is a list of what you may need!
- A Spoke Wrench
- Spoke Tension Meter
- Truing Stand Or A Bike Work Stand
- A Screwdriver
- Grease
The most important for this procedure is the spoke wrench. I have tried adjusting the spoke using other tools but it did not work out for me.
Increasing The Spoke Tension

We increase the spoke tension when your tension is low. Here is how you will do it:
Step 1: Measure The Spoke Tension
Now, the easiest method of measuring your spoke tension is by squeezing the spokes. If you don’t want to use a tool, this is an alternative that you can use. Squeezing the spokes on a wheel with good tension will give you an idea of what is acceptable. In fact, I have also tried this method. You can get a general idea of a spoke tension. When the spokes are properly tensioned, it is very hard to squeeze them.
I used the nipple fastener and it became more difficult to turn as the tension increased. The problem with this method is that it will not always mean that your tension is too high. Maybe it is difficult to turn the nipple because of corrosion.
But if you are just starting out, the best way to go is to use a spoke tension meter. I recommend you use the park tool tm1. It’s a tried and tested tool that flexes a spoke between two posts with a calibrated spring. The deflection is shown on its meter scale.
Since you are adjusting your spokes, how about checking if your bike chain needs to be tightened?
Using The TM1
To use the tool, you must know the diameter of the spoke along with its material. The wheel I am demonstrating has round steel spokes. The diameter in the middle of the spoke was 1.8mm. Now, when using the TM1, place the two fixed posts on the narrowest parts of your spoke. That will usually be the middle of your spoke.
Whatever reading you get, consult the tm1 chart. Find your wheel type section and navigate to your diameter section. On the tire that I just mentioned, I got a reading of 15. So going to the round steel spoke section on the chart, and finding my diameter section of 1.8 mm, I referred to the reading I got 15. The reading numbering is mentioned on the left end.
This placed my spoke tension at 58. Remember I told you to consult the rim manufacturer’s website to find the actual spoke tension? This is where it comes in handy. Whatever tension you get, consult the website to know where you stand.
My rim manufacturer calls out for a max tension of 110 kgf. Which means my tension goal should be 100 kgf. This means that for my spoke, the reading must be between 20 and 21.
Discover how to true a bike wheel and keep it running smoothly with our comprehensive guide.
Step 2: Get Familiar With Your Bracing Angle
It is possible that you get a different reading on the rear wheels as compared to your front wheels. The reading might be on the lower end. This is because, on rear bike tires, all spokes are coming out of the hub at different angles. This exit angle of the spoke from the hub is called the bracing angle. When your wheel has more angles, it has a more mechanical advantage and requires less tension as compared to the opposing side. This is more common on rear and front wheels with rotors.
Your tension goal should be on the side with more tension. The opposite side will have a lower tension when your centering has been corrected.
Step 3: Adjusting The Wheel Tension
This is where the truing stand will come in handy. Fit your wheel on a truing stand. Use spoke wrenches that are properly sized to turn the spoke nipple towards the end of the spoke.
Your number one priority here is consistent spoke tension. Otherwise known as a good relative tension. If your wheel is inconsistent spoke to spoke, as in my case, but on the whole, they were on the lower side. So, you will have to increase the overall tension.
Check out our experts’ top picks for the best road bike wheels to transform your ride
Since I performed this on a rear wheel with different bracing angles on both sides of the hub, the dish was changed slightly when I increased the tension. Keep this in mind and turn the spokes on the drive side. Turn it clockwise to increase or tighten the spoke. Turn one quarter each. For the spokes on the non-drive side, just give them one-eighth of a turn.
After tightening the bike spokes through the entire wheel, check again using the tm1. Using the above-described method, find out if you have given the spokes the right adjustment. If this is not the case, get your spoke wrench and repeat the process.
Your wheel might also need some truing to run smoothly!
Reducing The Spoke Tension
If while measuring the relative tension of your wheel spokes, you find that the tensions are high, you will have to reduce it. The process remains the same, there is no significant difference in reducing the tension process when we compare it to the increasing process. You will just have to rotate the spoke counterclockwise. One obvious difference is that you will turn the spoke nipple in the opposite direction.
This is mostly the case with the front wheels. For example, when I checked the front wheel of the same bike the tension was too high, about 30 kgf. The reason for this is that the front wheel has equal bracing angles on the right and left side spokes.
Loosen all the spoked by one-quarter turn. This will reduce the tension. Perform this process on your entire wheel and once you are done, recheck the tension.
Learn how to fix broken spokes on your bike wheel with our step-by-step guide
When To Stop?
How do we know when it is time to stop? Well, I am happy you asked. You will know that your wheel is properly tensioned when the wheel has a good radial true, and a good lateral true, along a properly centered dish. On the high-tension side of the wheel, your tension will be according to the manufacturer’s specifications.
While you can fine-tune as much as you want, sometimes a good radial true and lateral true will be enough to enjoy a good ride.
Why Is Spoke Tension Important?
Without spoke tension, your bicycle will simply fall apart. You might have noticed that when you are riding your bike, the wheel slightly flattens when it meets the ground. When this happens, the spokes at the bottom lose the tension. When their position is changed, tension is gained.
This process is repeated throughout your ride. When your tension is too low, the spokes will relax more than needed while riding. Loose spokes will create a snap effect. It will also put extra stress on your rim and spokes.
When the spokes lose tension over a short time, it is called detentioning. This process requires attention because it can spark the breakage of your spokes. Rim fatigue and a less durable wheel are also some of the side effects you may suffer.
On the other hand, tighten the spokes or if your spoke tension is too high, your rim might crack. It can break your spokes and also cause significant damage to your hub.
Since you are spending time maintaining your bicycle, let’s tighten and align those brakes too!
FAQs
What Is The Generally Accepted Relative Wheel Tension?
A wheel having spokes that are in the range of plus or minus 20 of the average spoke tension of the wheel is usually considered to have an acceptable wheel tension.
Is It Safe To Ride With A Broken Spoke?
Yes! You can ride with a missing spoke. It won’t cause much damage to your wheels either. But I recommend that you should remove the broken spoke in order to avoid further damage to your wheels.
What Can Cause A Spoke To Break?
A number of different things can result in broken spokes such as corroded nipples, faulty spokes, or incorrect tension caused by rocks or sticks.
Do Loose Spokes Make Noise?
Broken spokes can cause a continuous tick or click noise. It is produced when spokes touch each other at crossing.
Conclusion
Maintaining your bicycle regularly will ensure that your bike lasts a long time. I do know that adjusting all the spokes is a lot of hard work but using the right tools can make the process easier.
There might be some cases you might need a professional’s assistance to get the problem solved. Remember not to rush the process. It might harm your bike.
So, now that you are familiar with the process, are you going to try it out for yourself? If you are not sure where to start, reach out to me in the comments! I will be happy to help!
Also Read
- How To Install Hybrid Tires On A Mountain Bike: Can You Actually Use Them?
- How To Install Motor On A Mountain Bike: Experience The Thrill Of Motorized Mountain Biking