Isn’t it exciting? Going out to buy a new mountain bike? Man, I sure do love buying a new bike. But do you know that there is more to buying a new bike than just deciding on which color you like the most? That’s right! I am talking about bike fit, Again!
I emphasize buying a bike with the right fit because it is important for your safety as well as for having an enjoyable ride. And today I am talking about finding the right frame size! You guessed it, didn’t you? But first, you have to decide on what type of riding you will do on the bike. Is it going to be the weekend gravel muncher or the daily downhill dominator? After a person decides the type of bike that most closely fits his or her riding style, it is time to determine a size.

How To Find Your Best Mountain Bike Frame Size
A properly sized mountain bike frame is key in making certain that you get many comfortable hours on the trail. Similar to the number of bikes out there, there is no shortage of methods that can help a rider make that first step in the decision-making process.
1. Start By Measuring Yourself
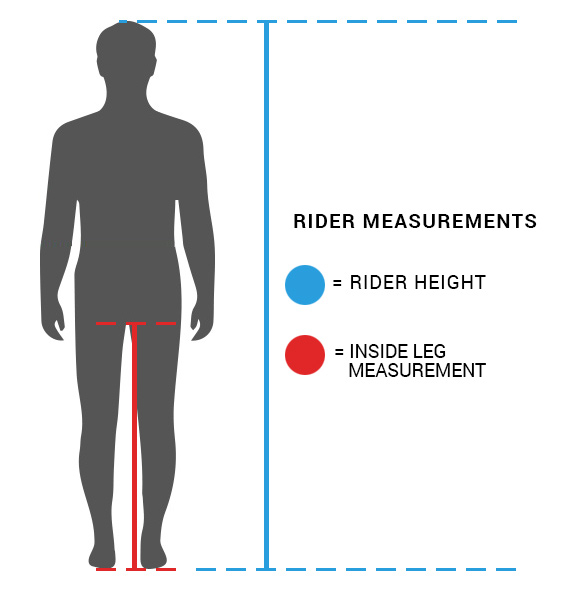
A few of the measurements that are close at hand are your own personal measurements. Height and inseam are the two that most directly relate to bicycle fitment. It is traditionally stated that a rider should be able to stand over his or her bicycle with about an inch of clearance between the pelvic bone, and the top of the frame.
This measurement is becoming less and less accurate with modern mountain bikes, and the geometry that the companies are building into them to handle the extreme terrain that we as riders are throwing at the bikes. There are a number of charts that can help narrow the decision and are easy to find online.
With a few simple measurements, the correct size mountain bike frame seems to be an easy decision. However, while using these types of charts, there is something extremely important to keep in mind. This fact is that it is crucial to be comfortable on your bike. You might be lucky to find your perfect size and fit with a chart like this, and they are no doubt a helpful tool for a rider early in the decision-making process. But, the more likely scenario is that it will be close, but not perfect.
I suggest making a trip to your local bike shop (LBS) and trying out a few different sizes. You may find that the proportions of your body (legs, and torso for example) are not stamped out from a generic human-shaped mold. My legs could be longer, or shorter than a person taller, or shorter, or even the same height as myself.
2. Measuring the Frame, and gasp… Some Math
Physical frame measurements are the next step in the process. Some websites show you fairly accurate measurements to make that will land you very close to that proper size. Bikeradar.com has a page dedicated to these measurements and using them to help make your frame decision. However, when making these measurements, it is helpful to know what it is that you are measuring. I will attempt to clarify some of these potentially mystifying terms.
- Top tube length: The measurement from the point on the bicycle where the stem on the handlebars meets the fork, to the point on the bicycle where the seat post recesses into the frame. On mountain bikes, this is usually not a horizontal line due to the sloping geometry designed to handle the rugged terrain. One can see where this would be an issue.
- Seat tube length: The measurement from the point on the bicycle in the center where the pedals are housed (further explained below) to the point on the bicycle where the seat post recesses into the frame. Another measurement that is not exactly vertical is due to the unique geometry of mountain bikes.
- Bottom bracket: While not mentioned on the above-listed website, it helps to know what this is to clarify some of the terms that I will use next. The bottom bracket is the cylindrical housing that contains the bearings to make smooth pedaling possible. The center of this cylinder is a common place to make measurements from.
- Head tube: The cylindrical bearing front frame section housing bearings that make smooth steering and control possible, the handlebars are indirectly attached to this part of the frame by the stem.
- Down tube: The down tube is the frame measurement from the bottom bracket to the head tube.
- Stack Height: Stack Height is also very critical, it is the distance between the bottom bracket center and the center of the top of the head tube. This measurement represents the minimum height of the bars while being related to the bottom bracket. The stack height is also related to the bike’s reach.
- G. Wheelbase: This is the horizontal measurement between the front and rear axles.
- H. Front Centre: This is the horizontal length between the bottom bracket center and the center of the front axle.
- Chainstay Length/Rear Center: This is the horizontal distance between the bottom bracket center and rear axle.
The next few measurements are neither listed on the Bikeradar site nor are they necessarily easy to make. These two measurements are gaining popularity in the mountain biking world, and it is a good idea to know what they are.
- Stack
- Reach
These two measurements correlate directly to how the rider feels on his or her pedals in relation to the handlebars. The stack is a vertical line drawn from the bottom bracket upward. The reach intersects the stack with a line drawn horizontally rearward from the head tube.
Knowing these measurements can bring clear focus to the size of mountain bike that a rider needs. If we look at a picture of this we can see that if we connect the two lines that the stack and reach represent, a right triangle is formed with the longest side being a line drawn from the bottom bracket to the head tube. This “comfort line” is the most critical measurement.
Some lucky riders (professionals for example) have the opportunity to try a wide variety of makes and models of bikes. These riders may find a bike that “just fits”. If a rider takes the diagonal measurement on the bike that he or she is most comfortable on it could be assumed that any bike that has a measurement close to this third line would be comfortable for him or her. This should be true for nearly all riders. And it is important to note that this line is not gender specific.
Once you have made all the necessary measurements, it is time to consult the mountain bike frame size chart. You can refer to the table below for the general guidelines.
| Rider's Height | Bike Size | Frame Size |
|---|---|---|
| 152-162cm (5ft – 5ft 4in) | X-Small | 13-14in |
| 162-170cm (5ft 4in – 5ft 7in) | Small | 14-16in |
| 170-178cm (5ft 7in – 5ft 10in) | Medium | 16-18in |
| 178-185cm (5ft 10in – 6ft 1in) | Large | 18-20in |
| 185cm plus (6ft 1in and Beyond) | X-Large | 20-22in |
With all of these measurements to be taken, finding a frame might pose an intimidating afternoon with a tape measure. This alone could scare away some people. Your local bike shop can help you with these measurements, and most shops will be more than happy to take that time with you. There are a number of benefits of having these measurements taken at your local bike shop. One is that if you buy the frame from them, some shops keep files for their customers for future reference. Another positive is that when it is time to fit the bike to you these will have already been taken, and the fitting procedure will be that much easier.

Related: Bike Size Chart
I’ve Measured Everything Now What?
The modern person looking for a mountain bike, or any bike for that matter, will no doubt be tempted to make their decision and purchase online. While this might seem to be an attractive avenue to pursue and might be convenient for certain riders, I would not purchase a bicycle without trying it out to see how it felt.
The online customer can usually find most of the measurements listed above on the manufacturer’s website. Keep in mind though, without knowing how a specific size frame felt before purchase, the risk involved would be great considering the price point of the modern mountain bike.

How To Get The Perfect Mountain Bike Fit: A Guide
You don’t just need to get the perfect mountain bike for yourself, you also have to fit it perfectly, if you don’t do that then what’s the point? There have been instances where even professional riders thought that everything about their bike was perfect until they realized that it wasn’t.
You don’t need to do much, just make a few basic changes to your setup and that will make things a LOT easier for you. Some of the small changes that you could make would be to change the bike tire’s pressure, and a different handlebar sweep, these are only some of the examples that you can make use of.
We will be discussing some sections now that will provide a general but necessary guideline for a mountain bike fit. Let’s start!
1. Seat Tube Length and Standover
To get the perfect mountain bike fit, you need to understand the bike first. When you see that the bike is listed down as “X” inches, what does it mean? What’s the first thing that comes to your mind?
The thing is, there is no universal standard about this, in some cases, it can be the distance between the bottom bracket axle to the top of the seat tube. It can also be the distance from the bottom bracket axle to the middle of the seat tube or any other area on the bike.
All of this relates to the Standover Height, and this is a very important part of a mountain bike fit or any other type of bike fit. Why is it so important though? This measurement governs the clearance of your crotch.
Let me explain it in simpler terms, the bike’s seat tube should allow you to have an acceptable standover gap. This is the distance between your crotch and the top tube. To get the feel of it, stand on as far as you can while you’re over the bike, and make sure that there is a minimum of an inch of space between your crotch and the top tube. This will make sure that you remain comfortable while riding.
In the end, your bike frame should allow you a large range of adjustment areas around the seatpost, but keep in mind that different mountain bikes will have different geometries.
2. Saddle Height and Crank Length
If you have been using mountain bikes for a while then you know that these bikes have either 170mm or 175mm cranks, these cranks should be well enough for any kind of rider. However, if you have short legs, you can have problems with long cranks, this can even cause you to use the wrong muscles which can lead to injuries.
If you have long legs though, then you are going to have a really good time with the mountain bike cranks. Since you will be going mostly for general trail riding, we would suggest setting the saddle height of your bike for maximum efficiency and power. You don’t want the saddle to be too high, this will waste your energy from rocking you side to side. Similarly, you don’t even want the saddle to be too low, this won’t let your muscles deliver optimal power efficiently.
You need to adjust your saddle height in such a way that when your foot is on the pedal, your leg is fully extended. This way, you will be able to pedal effectively without the knee being locked out.
3. Top Tube Length and Reach
The Top Tube Length is also something that you have to consider. Just like the saddle height, the top tube length, stem height, and handlebar position dictate how much you will be comfortable on the bike. This is why you should be careful with these components.
Let me clear something up for you when talking about the top tube length, you don’t need to worry about the actual top tube (We get that this is very confusing), you just have to pay attention to the reach number.
Yes, the top tube will indicate how much the bike is comfortable when you sit on it, but the reach figure is more critical when you are standing up or descending. The reach is also responsible for making you feel the size of the bike.
If you are a beginner, then you would like the bike to have an upright riding position, this will increase your comfort and there won’t be much weight on your hands and wrists. However, if you are a cross-country rider then you may want to go for a long and stretched-out position.
To sum things up, the reach is always going to be a compromise between control, pedaling efficiency, and comfort. Find out what works for you!
4. The Seat Angle In Correlation With Effective Top Tube Length
Did you ever notice that the cranks or the bottom bracket are never placed directly below the saddle, have you ever wondered why? You should be thankful that they are placed just the way they are, if they were placed directly below the saddle then you would just be placing excessive weight on your arms which could lead to injuries and extra stress on the body.
To make things better, the seat tube lies at an angle, this determines how far the bottom bracket will be behind the seat and how much you’ll be comfortable while seated. We don’t want it to be too much as that can be counter-productive, you also don’t have to worry about the range of these angles as they are already so narrow, that they don’t require further adjustment.
What if we compared two bikes that have the same effective top tube length but different seat tube angles? The difference won’t be too much but you will be able to shift your weight and have two bikes with the same reach, which is pretty useful for different cycling disciplines. You will also notice that the slacker-angled machine will have a bottom bracket that is more toward the saddle.
Important Note: I strongly advise against pushing the saddle too back, this puts distance between you and the handlebars and also increases the stress on your body. Sitting in this position will also limit your suspension fork from compressing efficiently, you don’t want that!
The best way to handle this situation is to sit further forward, this way you will get the maximum use of the fork and full use of the front tire. You will also benefit from better handling of the bike and increased comfort. Just make sure that you have chosen the correct reach for yourself.
5. Foot Positions and Cleats
If you are looking for the best mountain bike pedals, they will either be available in flat or clipless options. Flat and platform pedals are the easiest, the ball of the foot drops in a very relaxed position above the pedal axle which increases the user’s grip.
Clipless pedals can be very difficult to deal with, I would suggest that you find the ball of the foot and place the cleat underneath it. It is easier to shift back and forth once you have found this position, the goal is to put minimal strain on your muscles and improve performance.
The cleat angle should match the angle of your feet naturally, you don’t have to do this with flat pedals as it is done automatically. Good news for you, the modern clipless pedals have a built-in float, which helps your foot achieve a natural angle.
We urge you to experiment with each setting, and find out what suits you the best!
Benefits Of A Well-Fitted Mountain Bike
Here are some of the benefits of a well-fitted mountain bike:
- Enhanced Comfort: A well-fitted mountain bike will make sure that the rider is in a comfortable and natural riding position. This will also allow the rider to have longer adventures on their mountain bike without any type of discomfort.
- Improved Performance: If you fit your mountain bike properly then your overall cycling performance will improve. Since your body will be in an optimal riding position, it will be able to generate more power and the transition will also be seamless.
- Injury Prevention: A bike that is perfectly sized according to your body can prevent you from injuries and fatal incidents. There will no longer be any kind of discomfort while riding your bike and you will enjoy the overall experience.
- Better Handling: A mountain bike that fits you will allow you better handling, something which won’t be possible when you aren’t comfortable. Better handling will also allow you to have a grip over rough and technical terrain.
Risks Of Riding An Ill-fitted Mountain Bike
Here are some of the risks of riding an ill-fitted mountain bike.
- Consistent Pain and Discomfort: Getting a mountain bike that doesn’t fit your body will only lead to excruciating pain and discomfort. There will be unnecessary stress on your body which can easily be avoided with the right-sized bike. If not taken care of, you will experience pain in your neck, shoulders, hands, legs, and everywhere else.
- Inconsistent Performance: Once you ride an ill-fitted mountain bike, you will notice reduced cycling performance. Chances are that you won’t be able to produce the required cycling power or keep it consistent.
- Higher Risk Of Injury: An ill-fitted bike will only increase your chances of injuries or a fatal accident. This results from the inability to control the bike properly, since the bike and rider are not in sync, accidents will occur.
- Little To No Confidence: Since you won’t be comfortable on your mountain bike, there will be little to no confidence. Lack of confidence while riding your mountain bike will take away all the enjoyment and excitement.
It Just Doesn’t Fit!
If it comes down to it, and you are between sizes, there are a few things that can be swapped out to better accommodate your specific measurements. Crank arms (the arm between the pedal and bike) come in different lengths and could be a potential way to dial in fit on your bike. Another swappable item is the stem. This connects the steer tube to the handlebars and could be swapped out to either lengthen or shorten how far forward the handlebars are positioned. The handlebars themselves come in various geometries. A longer or shorter back sweep and rise could, and should be taken into consideration to achieve the most comfortable hand and arm position to reduce fatigue and improve control.
The rider’s saddle can also be adjusted forward and aft to get the riding position just so. These items are usually adjusted at an LBS, or in the rider’s home, and will be secondary to choosing frame size. It just pays to remember that these other pieces of the puzzle come into play while striving to achieve the proper fit.

There’s Gotta Be A Better Way!
Bicycle fit is rapidly becoming its industry, with high-tech computers and motion-capturing sensors that attach to the rider’s body to exactly tell a store, or fitter, the perfect size and fit for that individual rider. Sessions, where someone does this for you, are usually extremely accurate, and worth the time if that precise level of fit is required.
This usually is in a professional racing setting. However, if the rider desires that fit, or has unsuccessfully tried every other option, then it might be the only way to ensure that the bike and rider are in perfect harmony. This level of accuracy does require time, effort, and a high level of professional skill. These reasons justifiably dictate a premium cost at this time. It is just another thing to consider when choosing a frame size.
Recap
In summary, it is important to find the correct size mountain bike frame to reduce fatigue and ensure that the rider is comfortable and in control at all times. Several measurements play in the decision-making process, and taking these measurements will help to find that perfect mountain bike size. I feel that however important these measurements are, it is more important to find the size frame that feels the best to the individual rider. Remember, each of us most likely has different requirements and specifications for our particular shapes and sizes.
Finding the right feel can potentially be difficult, especially if the make or model of bike you are seeking out is not available to you. The professionals at your local bike shop can help you find a bike that feels right or can suggest another shop that can better serve you. In the end, it is most important that we as riders ride. To make sure that we ride, finding a frame size that feels the most comfortable to us goes a long way to ensure that the bike does not end up neglected.
I hope that now you have a clear understanding of mountain bike sizing and optimal fitting. If you have any problems, let us know in the comments below!
Also Read:
- How To The Adjust Front Derailleur On A Mountain Bike
- Best Mountain Bikes For Women
- How To Install Hybrid Tires On A Mountain Bike