Winter Bike Tires update: This page was refreshed on May 22, 2026 with a faster decision section, practical fit or safety checks, and clearer internal links for the next step.
Winter Bike Tires: Choose for Ice Risk First
Winter tire choice starts with the surface you actually ride. Packed snow, wet pavement, black ice, slush, and frozen ruts ask for different priorities. Studded tires help most when ice is likely; wider, lower-pressure tires help more when float and comfort matter.
| Winter surface | Best tire priority | Why |
|---|---|---|
| Black ice or freeze-thaw streets | Studs and cautious braking | Rubber alone can slide suddenly on ice. |
| Packed snow | Volume and tread stability | More contact patch can improve control. |
| Wet winter pavement | Puncture resistance and grip | Debris and cold rain can punish thin tires. |
| Mixed trail snow | Clearance and predictable tread | Rubbing tires are unsafe and frustrating. |
Do you need studded winter bike tires?
You need studded tires when ice is a realistic part of your route, especially on shaded streets, bridges, paths, and freeze-thaw mornings. If your winter riding is mostly cold pavement with no ice, a non-studded winter tire may feel faster and quieter.
Pair tire choice with the wind chill chart and winter bike maintenance checklist.
Winter bike tires can make your winter bicycling commuting safe. Now, you might be wondering do I really need winter bike tires? What difference does it make? A tire is a tire after all! I am glad you asked. Winter bike tires have special tread patterns. The studs are positioned in a way to provide more grip on the icy roads. You will experience a better grip, improved performance in wet and cold riding conditions as well as more puncture resistance! How cool is that?
You can see how important an investment in proper studded bike tires is if you really want to enjoy your bike 12 months a year, right? For winter, a few small metal pins could mean the difference between enjoying the view or ending up in the hospital because you slipped while making a turn. So, I’m going to show you which studded bike tires are the best. As promised, here are my detailed reviews.
The Best 5 Studded Bike Tires for Snow and Ice
Let’s take a look at some of the best-studded bike tires that are loved by many users.
TOP TIREBest Winter Bike Tires and Studded Tires: Comparison
Start with the job you need the product to do, then compare fit, compatibility, safety margin, storage, warranty support, and the tradeoff that matters most for your riding. This table is designed to help you narrow the list before you read the individual verdicts.
| Product | Rating | Price | Best for | Product path | Main tradeoff | Buy |
|---|---|---|---|---|---|---|
| SCHWALBE Marathon Winter HS 396 Studded Road Bike Tire |
9.0/10 |
Check current price | winter riders comparing ice grip, stud pattern, tire width, rolling drag, pavement behavior, and DIY alternatives | Product path | Verify fit, sizing, and current availability before buying | Check Price |
| Nokian Hakkapelitta 700×32 72 Steel Studs |
8.9/10 |
Check current price | winter riders comparing ice grip, stud pattern, tire width, rolling drag, pavement behavior, and DIY alternatives | Product path | Verify fit, sizing, and current availability before buying | Check Price |
| ARISUN Tires SHARKTOOTH |
8.8/10 |
Check current price | winter riders comparing ice grip, stud pattern, tire width, rolling drag, pavement behavior, and DIY alternatives | Product path | Verify fit, sizing, and current availability before buying | Check Price |
| SCHWALBE Ice Spiker Pro Folding Winter Clincher |
8.6/10 |
Check current price | winter riders comparing ice grip, stud pattern, tire width, rolling drag, pavement behavior, and DIY alternatives | Product path | Verify fit, sizing, and current availability before buying | Check Price |
| Kenda Klondike 27.5 x 2.10 Studded Tire |
8.5/10 |
Check current price | winter riders comparing ice grip, stud pattern, tire width, rolling drag, pavement behavior, and DIY alternatives | Product path | Verify fit, sizing, and current availability before buying | Check Price |
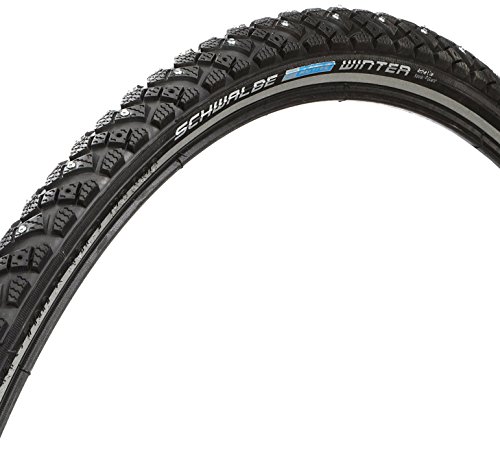
1. SCHWALBE Marathon Winter HS 396 Studded Road Bike Tire- Editor’s Choice
SCHWALBE Marathon Winter HS 396 Studded Road Bike Tire
Editor's ChoiceBest for winter riders comparing ice grip, stud pattern, tire width, rolling drag, pavement behavior, and DIY alternatives. Check the product page for current sizing, fit notes, and availability.
Pros
- ✓ Clear use case in the original review
- ✓ Product path reviewed
Cons
- ✗ Verify fit and availability before buying
Features
- 700c size
- Available in 40mm and 50mm width options
- Clincher wire bead
- Smartguard puncture protection
- Embedded tungsten carbide studs
- All-round wire bead
This tire has received a lot of positive reviews for its performance on challenging terrain such as ice patches, ruts in the snow-covered ground, or even powder snow. One of the most talked about features of these studded tires is their grip. Now, how long you will stay upright also depends on your own skill level, but counter steer at the right moment, and the wheels will provide the needed grip.
In most cases, you’ll remain in control of your bike even if you’re in 3†of snow. In fresh snow you can push it up to 5†and you’ll still be relatively safe. They also perform well on regular surfaces. What I liked was that I felt no irritating vibrations despite the stud making noises.
Our Verdict
SCHWALBE Marathon Winter HS 396 Studded Road Bike Tire
SCHWALBE Marathon Winter HS 396 Studded Road Bike Tire remains in this review for winter riders comparing ice grip, stud pattern, tire width, rolling drag, pavement behavior, and DIY alternatives. Compare fit, sizing, warranty, assembly needs, and current availability before buying.
Best for: winter riders comparing ice grip, stud pattern, tire width, rolling drag, pavement behavior, and DIY alternatives
Learn about the importance of checking your bike tire’s expiry date and how to do it yourself.
MOST DURABLE
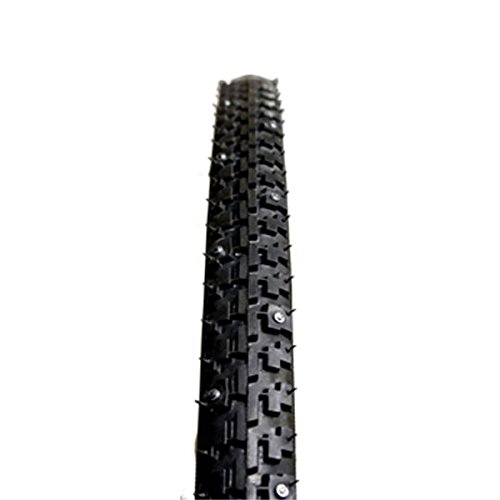
2. Nokian Hakkapelitta 700×32 72 Steel Studs
Nokian Hakkapelitta 700x32 72 Steel Studs
Ranked Pick #2Best for winter riders comparing ice grip, stud pattern, tire width, rolling drag, pavement behavior, and DIY alternatives. Check the product page for current sizing, fit notes, and availability.
Pros
- ✓ Clear use case in the original review
- ✓ Product path reviewed
Cons
- ✗ Verify fit and availability before buying
Features
- 700c
- Non-toxic rubber compound
- Tubeless compatible
- 72 steel studs
- Aggressive tread pattern
- Reflective sidewalls
Nokian is a tire found on many professionals’ bikes. The tires provide a safe ride even on icy terrain or in 3†of snow. This is possible with the position of the studs. The studs are located on the sides of the tire, giving you a grip when riding through icy or snow-covered tracks. The right pressure for these tires is 58 PSI. You can lower it to ride on icy tracks.
Our Verdict
Nokian Hakkapelitta 700x32 72 Steel Studs
Nokian Hakkapelitta 700x32 72 Steel Studs remains in this review for winter riders comparing ice grip, stud pattern, tire width, rolling drag, pavement behavior, and DIY alternatives. Compare fit, sizing, warranty, assembly needs, and current availability before buying.
Best for: winter riders comparing ice grip, stud pattern, tire width, rolling drag, pavement behavior, and DIY alternatives
Discover the best techniques for cycling in winter weather, including how to handle different types of snow and ice.
PRICE MATCHED WITH QUALITY
3. ARISUN Tires SHARKTOOTH
Price: Check current product page
 Features
 Features
 ARISUN Tires SHARKTOOTH
Ranked Pick #3Best for winter riders comparing ice grip, stud pattern, tire width, rolling drag, pavement behavior, and DIY alternatives. Check the product page for current sizing, fit notes, and availability.
Pros
- ✓ Clear use case in the original review
- ✓ Product path reviewed
Cons
- ✗ Verify fit and availability before buying
- 152 tungsten alloy studs with zinc-plated steel base
- Three rows of longitudinal tread lugs arranged in a directional V design
- Available in 26×4.0 and 29×2.8 sizes
- Aggressive tread pattern
- Tubeless Ready
ARISUN uses a unique approach to stud placement in this tire. The 152 studs are positioned in the form of Vs. This provides you with traction the entire time the wheel is rolling. If you’re shopping on a budget, you can consider only placing a studded tire on the front wheel.
Some riders still manage enough grip to travel safely with this setup. The studs themselves are trustworthy because they’re made of zinc-plated steel with a tungsten alloy tip.
Our Verdict
ARISUN Tires SHARKTOOTH
ARISUN Tires SHARKTOOTH remains in this review for winter riders comparing ice grip, stud pattern, tire width, rolling drag, pavement behavior, and DIY alternatives. Compare fit, sizing, warranty, assembly needs, and current availability before buying.
Best for: winter riders comparing ice grip, stud pattern, tire width, rolling drag, pavement behavior, and DIY alternatives
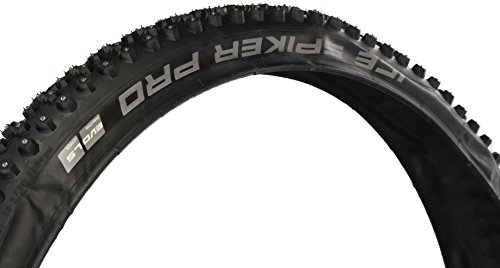
4. SCHWALBE Ice Spiker Pro Folding Winter Clincher
SCHWALBE Ice Spiker Pro Folding Winter Clincher
Ranked Pick #4Best for winter riders comparing ice grip, stud pattern, tire width, rolling drag, pavement behavior, and DIY alternatives. Check the product page for current sizing, fit notes, and availability.
Pros
- ✓ Clear use case in the original review
- ✓ Product path reviewed
Cons
- ✗ Verify fit and availability before buying
Features
- Available in 27.5×2.25 and 29×2.25 sizes
- 378 tungsten carbide studs
- Foldable bead
- RaceGuard puncture protection
The Ice Spiker Pro provides a firm grip on snow or icy terrain. Many users have reviewed that these tires perform well in mud too. With this product, note that the manufacturer advises them to be used for 25 miles on normal asphalt before putting them to the test on snow or ice. This will ensure the studs are forced into place permanently.
For your own safety, I suggest you purchase these studded bike tires in the summer before the snow falls and take time to prepare your bike for winter.
Our Verdict
SCHWALBE Ice Spiker Pro Folding Winter Clincher
SCHWALBE Ice Spiker Pro Folding Winter Clincher remains in this review for winter riders comparing ice grip, stud pattern, tire width, rolling drag, pavement behavior, and DIY alternatives. Compare fit, sizing, warranty, assembly needs, and current availability before buying.
Best for: winter riders comparing ice grip, stud pattern, tire width, rolling drag, pavement behavior, and DIY alternatives
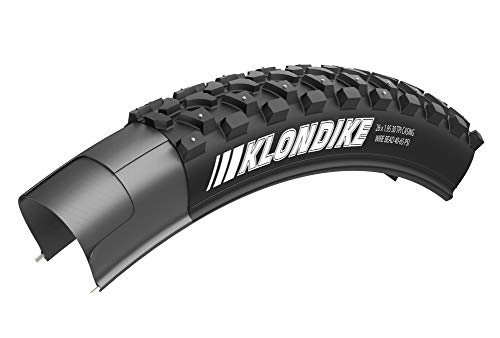
5. Kenda Klondike 27.5 x 2.10 Studded Tire
Kenda Klondike 27.5 x 2.10 Studded Tire
Ranked Pick #5Best for winter riders comparing ice grip, stud pattern, tire width, rolling drag, pavement behavior, and DIY alternatives. Check the product page for current sizing, fit notes, and availability.
Pros
- ✓ Clear use case in the original review
- ✓ Product path reviewed
Cons
- ✗ Verify fit and availability before buying
Features
- 168 carbide-tipped studs
- Directional tread pattern
- Easy installation with wire bead
- Available in 26×1.95, 26×2.10, 27.5×2.10, 29×2.10, and 700c sizes
One of the first things you’ll notice is the weight because these are heavier than some others. When you compare rolling resistance it may be slightly less impressive than the normal tires of your mountain bike. But that doesn’t mean they don’t work: they’re still highly valued. Especially by commuters looking for an affordable tire option.
This brand may not be as impressive as the more expensive Nokian, because you need to replace them after 1000 miles or so. They are a feasible option if you’re new to riding in snow and shopping on a budget.
Our Verdict
Kenda Klondike 27.5 x 2.10 Studded Tire
Kenda Klondike 27.5 x 2.10 Studded Tire remains in this review for winter riders comparing ice grip, stud pattern, tire width, rolling drag, pavement behavior, and DIY alternatives. Compare fit, sizing, warranty, assembly needs, and current availability before buying.
Best for: winter riders comparing ice grip, stud pattern, tire width, rolling drag, pavement behavior, and DIY alternatives
Advice for Using Studded Tires
There are some things you need to be mindful of when using studded tires:
- The right pressure for most of these tires is 58 PSI. You can lower it to ride on icy tracks. Keep the pressure to the minimum.
- Test the pressure regularly before heading out.
- Be very mindful on turns and while braking to not lose control.
- Make sure that you inspect your tires before you head out.
- Watch out for the potholes. These tires can get stuck in them.
- Once you get home, do not roll the tire on your floors because the tungsten carbide studs will leave scratches. It’s safe on carpets, but almost any hard surface will suffer.
Read reviews and opinions on winter cycling gear that has been tested in icy conditions.
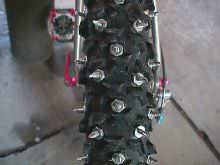
Home Made Studded Tires- How Can You Make Them?
You can manufacture a studded bike tire for a lower price. Homemade studs are usually heavy, and prone to flats. However, most serious bike riders have the necessary spare knobbies lying around, and with a few cheap materials, you can have a lot of fun out on the lake.
Tools Needed For Making A Studded Tire
This usually involves installing screws through the casing, from the inside. This usually necessitates a tire liner (perhaps just a extra dead tube) to prevent damage from screws that back out, or abrasion from screw heads.
- One tire. You need a tire with knobs big enough to support the stud. The stud as explained further down, has to be on the
- 50 (approx.) Robertson head #8 by 1/2″ sheet metal screws (the square head, you’ll thank me for this tip) for mountain bike tires (26inch) or #8 by 3/8 inch for hybrid tires (700c)
- Liner for each tire. This can be made by cutting the beads off an old tire, cutting out the valve, and slitting along the inside of an inner tube or just buying a Mr. Tuffy tire liner.
- Baby powder.
- One sharp awl. (or a 1/8″ drill bit)
Instructions
- Count the knobs and evenly spread out the 25 screws for each side.
- Punch holes, from the outside of the tire, into the designated knobs. You can drill the hole, however, drilling tends to tear the fabric and thus weakens the tire. Caution you don’t need a million screws in there! Too many screws just slow you down.
- Use the Robertson bit in the drill to drive the screws in the tire from the inside.
- Put liner inside tire and make sure it covers the screw heads
- Put a generous dusting of baby powder between the liner and the tube.
- Mount tire on the rim (ouch! Watch out for the points!)
- Inflate to maximum pressure. Put the wheel on the bike (mind the points). Spin the wheel to make sure that the studs don’t catch on anything.
Guidelines For DIY Studded Bike Tire
- You only need to stud the front tire to keep upright. However, if you stud the back tire as well, it’s even better. One caveat is that these tires are only suitable for winter conditions.
- The difference between one studded front and no studded tires is phenomenal. When the bike is traveling straight the studs shouldn’t be hitting the road too hard. Otherwise, they will just wear out too soon. Here’s the good part, when the tire slips just a bit the studs will bite in. You rarely notice the slight side-to-side movement.
- You don’t need to stud the middle knobs since you only need the added traction when you are turning. The studs should touch the road enough to allow sufficient braking. The studs in the middle knobs wear out very fast and soon become useless anyway.
- Stainless steel screws will last much longer but also cost about 3 times as much. You can change screws as they wear out. Your tire can survive several sets of studs.
The Edmonton Bicycle Commuters Society recommends this method.
Learn whether your bike tires have a specific direction and how to tell which way they should be mounted.
Are All Studs Created Equal?
As arranged on the Icebike mailing list, I volunteered to perform hardness tests on a few studs from winter bicycling tires. Several others agreed to send samples of studs and shortly I received studs from 3 different studded tires: Nokian, IRC, and Nashbar, to measure their hardness.
At last, I have the stud hardness test results! Here is my report:
First The Background
In a hardness test, a small indenter (in this case made of diamond) is pressed into the surface of a metal sample with a known force. The result is a small impression, and the size of the impression is an indication of hardness. The smaller the impression, the harder the material.
The term “Hardness” is really a measure of the ability of a sample to resist indentation, and in itself, it is meaningless and only becomes useful when compared to the hardness of something else. There is a definite relation between hardness and strength and wear resistance. Harder materials are stronger and more wear-resistant.
To measure the hardness, the sample must be properly prepared. The standard metallographic technique is to embed the sample in a plastic “mount” which allows the technician to hold the sample in proper alignment for preparation. In this case, the studs were laid on their side in the mount. The face of the mount was ground down, and in the process, the studs themselves were partially ground away.
In this case, we ground the mount until about half the studs were ground away, revealing a cross-section through the stud centerline. This surface is then polished to a mirror-smooth finish since the hardness impressions are microscopic and surface imperfections could affect the result, thus the need for a flat smooth surface.
Here is an image of the prepared mount with the ground and polished studs showing their cross sections.
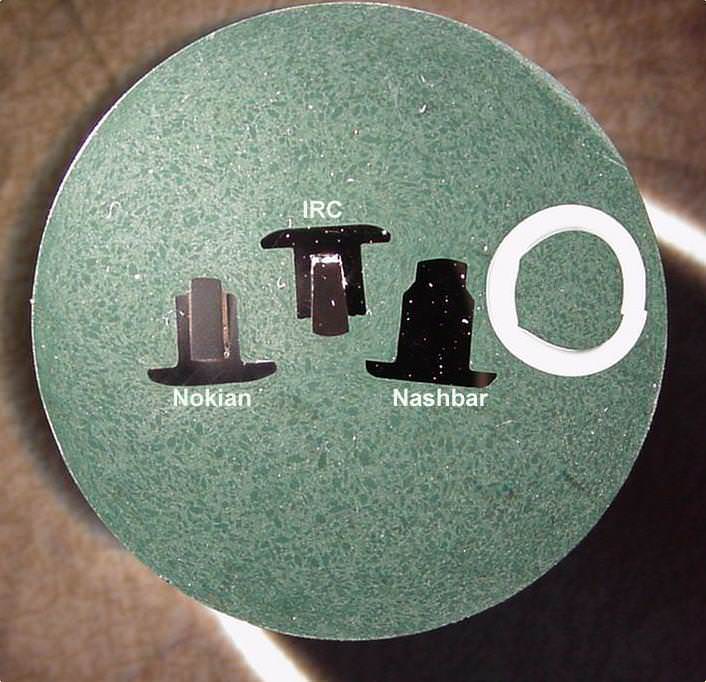
It can be seen that the studs have a “T” shape cross section. There is a head at one end (like a nail head), a body, and a tapered end, which is the “business” end of the stud that makes contact with the ground.
Now The Results
It is immediately obvious that the Nokian and IRC studs are made from two pieces: the stud body which is steel, and an insert brazed into the center of the stud. It is the brazed insert that is in contact with the ground, and the body is simply a holder. The Nashbar stud is a single piece of steel.
The Nokian insert had a hardness of 1700 KN (Knoop hardness scale). The IRC insert had a hardness of 1400 KN. The Nashbar had a hardness of 350 KN (corresponding to about 57 HRC for those who care about such things).
The Nashbar stud is by visual examination and hardness testing, simply hardened steel. It was harder on the surface than in the center, which implies a low alloy and/or low carbon steel (ie: less expensive steel), as something this small should harden throughout its thickness when heat treated – there should be no hardness gradient.
I made no attempt to identify the composition of the IRC or Nokian inserts (that would have been a bit expensive), but my best guess is they are “carbide”, a very hard, wear-resistant material commonly used for high-wear applications like metal working tools, saw blade edges, and so on.
A word of caution: Don’t try to attach a “value” to the relative hardness of the studs. The Nokian is not “5 times better than the Nashbar” nor will it “last 5 times longer”. All that can be said is that the Nokian and IRC are “substantially harder and will be much more wear-resistant” than the Nashbar.
As a metallurgist, and knowing the environment these tires run in, I would be very surprised to see significant wear on a Nokian or IRC stud, whereas, on road surfaces, I would expect wear on the Nashbar. Running on dirt or ice the Nashbar may hold up much longer.
On a personal note, I am impressed with the degree of technology exhibited by the Nokian and IRC tires. There is considerably more cost involved in preparing the stud to receive the insert, and then going through the brazing process, compared to the Nashbar stud which is simply machined and then heat treated. I can understand why the Nokian tire is so expensive!
Background reading: Microhardness Testing
By Bill Dobson[/box]
Tire Chains- Can You Use Them As An Alternative?
In addition to studded tires for supplying winter traction, there are also bike tire chains and bike tire wires. These usually attach to the tires, while avoiding the bike rims so as not to interfere with the brakes. The chains cross the tread providing traction in deep snow and ice. The wire variety usually holds chunks of metal with teeth positioned over the tread.
You’ll experience a bumpy ride on pavement as compared to the studded tires. However, some claim that bike chains provide better traction than studs in thick snow and that brown compacted but un-consolidated squirming mass forms when cars drive over new snow but it is too warm for it to freeze to the ground. The good news is that when it is really snowy, you won’t feel the bumpy ride.
Is It Possible To Make Homemade Chains?
It is also possible to make your own tire chains for bike use. Not limited to winter ice and snow. These are also suitable for mud and off-road work. While probably inappropriate for public trails over delicate ecosystems, they should work well on semi-frozen snow trails if your bike has the clearance to accommodate them.
Keep your bike in top condition during the winter months with these maintenance tips.
Problems With Using A Bike Chain
1. They have a light construction
Tire chains for bikes are far more lightly constructed than those for cars. They also have the attendant problem that the tire rims must not be obstructed because that would interfere with the brake pads. This latter restriction does not apply to coaster brake bikes or bikes with disk brakes.
2. They need to be installed tightly
You also have to install them tightly because they can come off in sudden turns. For this, you will have to deflate the tire to a degree, install the chain, and then re-inflate the tire. This means that if you intend to do this on the road you have to have a pump.
Discover the most common causes of bike tire pressure loss and how to prevent them.
3. They are less safe
Other than the rough ride there have been other problems reported with these devices. My local bike store owner reported that they sold only two sets last winter (different brands), and had trouble with both of them. One caused an accident when it came loose and seized the front wheel. This is apparently not that rare.
Studded Tires Vs Chains- What’s Best?
Chains are said to be better on unplowed roads and trails where there may be 6 inches of uncompressed snow below your wheels, some trampled and uneven. Others claim that the newest version of studded tires do better in these situations and are lighter and less problematic.
In my opinion, unless you are riding in deep snow 100% of the time, chains are not a good option. It’s a task to put the chain on a tire itself and not to forget that the chain accelerates the wear and tear of your tire. There are studded bike tire options now that are an all-rounder. You can ride them throughout the year.
You can also discuss this with your fellow riders. See what they are using and why. Get back to me in the comment section below!
FAQs
What type of rims and wheels do I need for winter biking?
Wider rims are better for winter biking because you will be able to have low tire pressure without frequent pinch flats. A low tire pressure is important for studded tires to perform on ice.
Are winter bike tires worth it?
Yes, winter bike tires provide improved traction. They also make it safe to ride on snowy roads and icy tracks.
Can you put winter tires on a road bike?
Yes, you can put winter tires on a road bike.
Which tires are best for winter?
Studded tires are best for winter.
What is the disadvantage of winter tires?
The disadvantage of winter tires is that they are costly. They also do not perform well in dry conditions.
Conclusion
Some snow terrain is simply impossible without wide rims. If you spend much time off the road in winter you will likely sooner or later find yourself on wide rims. Needless to say, if you are a bicycle commuter who loves to get around on a bike, You don’t have to give up on winter commuting anymore!
The studded tires will help you get back on the icy roads. Don’t forget to wear winter appropriate safety gear and carry some water! Do you use a bike chain or studded tires? If you have any other concerns, reach out to me in the comment below. I will be happy to assist!
Photo Credits: Charlie Beristain, John Andersen, and Simon Rakower.
Also Read
- This Is Why You Are Cycling Slower In The Winter
- Fenders For Ice And Rain Biking (Mudguards)
- Real Winter Biking – This Is How You Cycle In Really Cold Weather
- The History Of Ice Biking And Winter Cycling
- Winter Cycling In Ottawa, Canada – How To Commute All Year Round
- 5 Cycling Stories Covered In Snow And Ice

20 thoughts on “Winter Bike Tires and Studded Tires: Updated Picks”
Really well written and interesting article!
However, since you mentioned being a metallurgist; what metal do the studs for winter tires come in? And what should I use to avoid rust?
I had some winter tires before where the studs rusted. Causing stains on my floors as I have to bring the bike inside to park it.
Thanks for any recommendations!
Good point. I have reached out to Nokian to get more information about the metal that is used for the studs.
Try the new 45Nrth Gravdal folding winter tyre. It has tungsten carbide spikes in an aluminium housing, so at least that part will not rust. More studs than most in this size (252), plus, quite uniquely for a 700C, it has a folding kevlar bead and high thread count (120 TPI) which means it is lighter and more supple than the average winter “tractor” tyre. Very expensive but ygwypf.
I have Suomi studded tires (ordered Nokian but these came, appear to be made by Nokian…) that worked great but are showing a bit of rust. What to do before I store them for the ‘warmer months’ here in Chicago.
Interesting ideas ! I was enlightened by the details . Does someone know if my company could possibly get a blank TX 130-U copy to complete ?
Very good and informative. Thanks for your efforts.
Hello,
Are there any reasons why you did not discuss the Schwalbe line of winter bike tires? I have been riding Marathon Winter studded tires on two of my bikes in an urban street setting for many years (4th year on my Dahon folding bike and 2nd year on my hybrid winter bike conversion). I have nothing but good to say about them.
i have been using Schwalbe here in northern Sweden for 5 or 6 winters now and rate them as much more durable, especially when considering the rubber, than Nokian… i ride daily and have put many, many miles on these tires with only great things to say about them 😀 i only came here because i was curious about inserting studs to a 20″ front tire for a Bullitt frieght bike… otherwise i have no doubt that Schwalbe is the solution 😉
Is there a 20″ studded tire for a trail-a-bike that will match a 26″ winter tire (such as, for example, the Ice Spiker Pro Schwalbe tire or equivalent)? Thanks.
I ride with Schwalbe Marathon Winter studded.
They are GREAT. Never had a problem!
If using homemade studded tires, can you just run tubeless tires and not worry about tire liners? Or will air leak out around the screws?
Tubeless with preparation. If installing regular screws drilled from inside out use a FLEXIBLE but strong contact cement on every screw head inside the tire. make sure to cover the heads with enough cement. Allow to dry for several days then add a layer or two of lightweight but strong adhesive tape. Allow to dry and stick completely to the tire over several days. Inflate the tire with sealant and test over several rides. There will be leaks but the sealant will take care of that. Using this tubeless setup and tire pair for 8 years with no issues. My best setup is 4 years old and still going strong as tubeless. I used screw in, carbide tipped studs outside in and dipped/sealed EACH stud with WATERPROOF Loctite flex adhesive. Magic Mary up front and Nobby Nic in the rear. approx 200 studs each tire. Great in deep snow, flawless on any kind of ice, ice ruts, etc. Make sure the studs are sized correctly (8mm amd 9mm in this case) and DO NOT penetrate the carcass of the tire. This is critical to preserve options for trailside flats using a tube. To this day I have not lost a single stud. A little worn but All the spares studs are sitting in the garage, waiting…..I do not ever use this setup on pavement. Happy Trails!
Excellent blog! Do you have any hints for aspiring
writers? I’m hoping to start my own blog soon but I’m
a little lost on everything. Would you recommend starting with a free platform like WordPress or go for a
paid option? There are so many choices out there that I’m completely
overwhelmed .. Any ideas? Cheers!
Thanks, great blog! I too am running Schwalbe Marathon’s in the winter (26×2.25). Work great on ice and are good in powder snow up to about 3″ or so… The tires do not have large knobs so they don’t do well in 2 or more inches of wet/heavy snow. Surprisingly a 700 x 28 road tire does quite well in untracked snow covered roads and trails. The tire will knife through several inches of snow and I found good traction.
Hi,
Grest Blog?
Tell for a powerful E-BIKE?
Which Ice stud tires should I buy?
Spoke to Schwalbe, they said no ice studs for electricity? 🙁
Best
Jorn
Thanks for all the info! Nicely written and easy to follow 🙂
Given that your #1 recommendation is the SCHWALBE Marathon Winter, and that this blog is marked as being updated for 2019/2020, I’m surprised that you don’t mention the existence of the SCHWALBE Marathon Winter *Plus* which I believe may have come out in 2018?
To me this tire offers nearly total upside to the non-Plus version, the only negative is higher price. The major difference is that there are four rows of studs across the width of the tire, I believe making the total stud count 210 on a 27″ tire. They appear to be equally spaced across the width — which means none run right down the middle. The advantage here is by adjusting tire inflation day to day, you control how many studs are engaged: for icy conditions keep pressure low so all four are in nearly constant contact with the ground, while on days the pavement is ice-free, maximum pressure means except when corning only the inner two rows of studs engage the pavement. I recall they also might have improved puncture resistance, the regular Marathon WInters are a “4” on their scale and the Plus are a “5?”
p.s. for US readers, they were hard to find and crazy expensive here, at least back in 2018. I recall around $100 or ore each. But they were pretty affordable if you buy from a German seller and had them shipped, especially if you have other things to buy at same time and are paying flat rate shipping to US (I paid 25 euro shipping). Just be prepared to wait a few weeks!
Hi I am making tinier homes Wich are capable of quarantine living in winter months. Shower, toilet, etc. With bicycle hitch. I am looking to recycle metal, and manufacture my own rims if necessitated. But really I want bicycle snow tires, and or an “off the shelf” tire and rim solution. 20″ is about the smallest for contact area and steerability on snow ice, any ideas for something like load bearing spoke sleeves, or something capable of spreading a 1000lbs load across 4 tires? Since my tinier homes only weigh about 250lbs dry weight, add two people at 250lbs each, and backpacks, that’s why 1000lbs… I am planning a solid tire core, and bearings other than bicycle bearings, perhaps a dual bearing (bicycle bearings, with the axle in secondary bearings in case of failure under power) driven by a DC motor set, for the eventuality of no tow trike, or self propelled movement for emergency use. Disk brakes, few gears, and low gears only. If you have ideas I am listening… Since it sounds like snow cats (from multiple sources)are the way to go, I am wondering if this is really viable or if I need to tool up for supplying my nitche market? As I am already attempting to stage small scale recycling, and product manufacture, I don’t mind doing it myself but a side by side price comparison, supply chain analysis, and or loan for overhead/stock, is much easier to approach with all the information, and options. Also quite honestly I might wind up using deer cart tires as a temporary alternative, but the ride will be hard to control, and bumpy like an alligator with warts… And backup drive system far more complex… Although I can get my weight rating all day. Also it parks on levelers at night to eliminate parking brake issues.
It was always my understanding that with any kind of snow tire that you do not want the snow to shed (mud yes, snow no). This is why M&S (Mud and Snow) tires are a misnomer as one tire will not be good for both conditions.
Mud will fill a tread and turn the surface into a smooth slippery surface that will not grip. Hence the need for deep, widely spaced lugs that shed the mud as best as possible. Snow, on the other hand, will stick in the tread and provide grip by the snow in the tire sticking to the snow on the road. I have read that the more the tread areas are perpendicular to the direction of ration that better grip you will achieve.
The Saami from Finland wore snow boots made from reindeer hide with the animal’s fur still on them, including the soles. These would be treacherous to wear on your kitchen floor but the snow would pack and stick to the fur on the sole, which in turn would stick to the snow covered ground, providing excellent traction.
Just some thoughts, I am sure there are a lot more factors at play when analyzing the performance of any winter snow tire. It’s just that I constantly read about large treads and “shedding snow” which in my experience is not what you want…cheers!
After all the studs are installed, inspect the tire to ensure that they are all properly seated and secure. Make any necessary adjustments.