To learn more about ice biking, check out this page. You might also want to check out our guide to winter cycling clothes and winter cycling gear.
NiteRider Tail Light
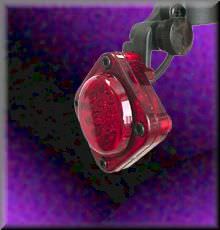 This weekend I finally received a NiteRider 6V tail light in the mail. This thing is awesome. It has 16 super-bright LED’s and is vastly brighter than my Cateye LD-500 flasher. The NiteRider tail light is quite a bit smaller than my Cateye flasher because there are no batteries inside. That’s the price you pay for being so bright – it’s not practical to power from a pair of internal AA or AAA batteries.
The instruction sheet says it draws about 1.1 Watt (170 mA) in flash mode, and 3 Watts (500 mA) in continuous mode. It is intended to be used with NiteRider light systems, powered from the same battery that powers the headlight. But it is possible to use the tail light with other brands of headlights, or alone with it’s own dedicated battery.
The LEDs radiate a high intensity beam that is 12 degrees wide, quite a bit wider than the bright part of the beam on my Cateye flasher. The side illumination is also MUCH brighter than the side illumination of my Cateye flasher.
This morning I set my commuter bike on the patio with the NiteRider tail light and my amber LightMan strobe facing directly into the sun. Both lights were clearly visible but the flashing NiteRider tail light was more attention-getting than the amber strobe. I didn’t bother comparing my Cateye flasher because I can’t even tell if the Cateye flasher is on when it’s facing the sun.
The standard NiteRider tail light comes with a seatpost clamp mounting setup. You can also buy a rack mount version. The seatpost mount version comes with a straight cable that runs from the tail light to a NiteRider headlight. A socket in the cable connects to the battery so that a single battery powers both the headlight and the tail light.
The rack mount version comes with a longer coiled cord. Both versions have a thumb screw that theoretically allows you to quickly remove the tail light. But, I see two major flaws in this concept. First, when you remove the tail light you stand a chance of dropping the thumb screw (in the snow, or into a storm sewer), especially when wearing gloves. To avoid misplacing the loose screw you need to spend a few more seconds screwing the screw back into the tail light.
Second, the power cable is permanently attached to the tail light. So to remove the tail light you also have to remove the power cable that runs to your headlight and your battery. The cable has a two Velcro straps that hold the cable to your frame. The Velcro strips would be difficult to manipulate with gloves on. I’m sure the tail light is more waterproof without a connector, but the fixed cable makes it much more difficult to remove the tail light.
The tail light doesn’t seem practical for a winter cyclist to remove every day, so I chose a different approach. I semi-permanently attached the tail light to my bike (no thumb screw). A thief could still remove the light, but not with bare hands. So I’m gambling that nobody will steal the tail light (which cost me US$55). I park my bike at work in a relatively secure area, so theft is not a major concern.
The tail light is so small (4x4x1.5 cm) that it kind of resembles a red reflector or a cheap LED tail light, so I’m hoping that it won’t attract the attention of thieves. If you park your bike in a high-theft area you would need to remove the light.
An alternative is to attach the tail light to a backpack or a pannier that you carry with you. If you do this you will need the rack mount version and you may want to use a separate battery to power the tail light. And you should ensure that the tail light is vertical and aimed directly behind you (not a trivial task when the light is attached to the flexible fabric of a backpack/pannier).
My overall conclusion is that the NiteRider 6V tail light is by far the brightest tail light you can buy. I highly recommend it, but caution that the mounting system is NOT optimized for winter cycling. For those of you who have 12V lights systems, NiteRider sells a 12V tail light that has 16 LEDs and a digital version with 19. I suppose it is even brighter!
It’s getting to the time of year when I don’t ride at night very often. But the NiteRider tail light is so bright and effective that I plan to use it during daytime as well as at night.
by Wayne Estes
NiteRider Pro-6
NiteRider Pro-6 (formerly known as Cyclops) 15 watt light (not sure if you can compare this to other lights strictly by wattage). When I started bicycle commuting in May 1997, I started with a Trek light set that takes 2 C batteries. As I eased into my first icebiking season I discovered that when the C batteries get below 40 F that they didn’t work in the light, so I was forced to get a quality light.
I think I paid $140 for the NiteRider “Cyclops” (now Pro-6) from REI going into the 97-98 season. This served admirably, especially considering I’m really a street user and a lot of streets have street lights in Chicago. The clamp fits best on straight bars or road bars with no accessories around the stem.
The battery got damaged right before we set out from our 01-01-99 icebike ride. I have no idea what happened but into the first mile, I discovered the wire separated from the plug in the lamp. The wires were jerked clean from the plug and could not just be put back. I had no idea which wire went where.
I found another plug from Radio Shack. I soldered it up and luck would have it that I attached them criss-crossed, so I damaged the charger. At this point I had to ride at night and needed a light, so I went out and bought another identical light (NiteRider Pro-6) in January 1999. I also reversed the leads on the old one and got the old one to work, so I had 2 lights.
The consolation was that my wife now had a light for her bike and I also could alternate batteries if one wasn’t charged and had replacements parts if one broke. So I used the newer Pro-6 throughout early 99 and the 99-00 winter. I also found out that though I soldered electrical wire back to the plug, that the line was now high maintenance and tended to bend and short out and require more soldering.
Later the wire separated from the plug again. I again reconnected the wires to the wrong leads and had to buy another charger. I had bad luck. Real stupidity here: I set the wires in the right position and charged the battery up correctly, but then they separated again like a day or two later and I reconnected them to the wrong leads again! I again had to get another charger. At this point I had somewhat solved the battery lead problem, even though I had spent a fortune.
Here’s a summary of the good and bad points of the NiteRider Pro-6:
The good:
- The 15w that a good provides is pretty good for winter commuting.
- Very waterproof construction (they make diver lights also) beyond practical needs.
- You can drop the light on the floor and it doesn’t break and barely even scuff if.
- Battery life approaches 2 hours on a fully charged battery, though I wonder why the technology isn’t there to go longer. Doesn’t seem a lot to ask for.
- The mounting is fairly good if your bars aren’t loaded up with accessories.
- The price seems a high jump from the standard $20-40 light sets, but given what else is on the market, the price is OK.
- NiteRider answers emails regarding their product, even over the phone. Never sent an email that wasn’t answered to my satisfaction.
OK, but could be improved:
- Weight of the whole system is somewhat heavy, mainly the battery, which is the water bottle kind.
- Few options for non-standard mounting. I later installed aerobars. For a while I tried mounting on the front triangle of the aerobars with another NiteRider non-offset mount. This did not work on the Profile Century aerobars, because you can’t mount on a bend. The only other real option was to mount the light upside down slightly to the side under the aerobars. This is not really NiteRider’s fault.
- You can’t screw out the wire from the battery of do any servicing on the battery wire.
- The set nut on the clamp is set in plastic and can pull through under high pressure, or at the least turn inside the plastic.
Bad points:
- The charging system. The Digital Pro-6 limits the charging to 14 hours but does not solve the problem with overcharging partially charged batteries. You can possibly overcharge the battery if you go over about 14 cumulative hours. What complicates this is if you only use the light a little on a full charged battery and charge it, the 14 hours of charging is too much.
- There is not only the danger that you overcharged the battery, but the possibility of over discharging the battery. This occurs when you keep riding the light until it’s almost out. Once the light starts going dead you damage the battery.
Theoretically the light is supposed to last like 1000 charges or whatever. However, if you overcharge or over discharge the thing a few times and you’re damaging the battery.
- Last week I discovered after letting the battery charge 14 hours overnight that it was not working the next day, or the light was VERY dim. The best I can get is about 12 minutes on a “full charge” and at that point it is quite dim. This on a battery with only 18 months of use!
by Bob VonMoss
NiteRider Pro-12
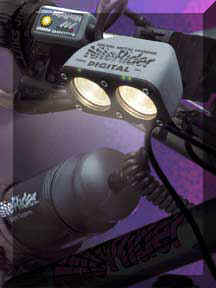 After my experience with the NiteRider Pro-12, (see above), I looked into the other NiteRider products. For me the desirable features for me were more watts than the Pro-6 and at least 2 hours of service. The only other real improvement was the NiteRider Digital Pro-12 Extreme.
When I saw the MSRP over $300, I immediately dismissed this as absurd. I began looking into other lights with few manufacturers except other stuff in a similar price range. I’m sure there was stuff out there. I had heard many bad things about the NightSun support.
I knew I wasn’t going to try to build my own light, because I had to rely on this every day. Maybe I’m stupid, but I went out last week and bought the whole enchilada. (For the price I could have bought several hundred enchiladas.) I also got the overpriced taillight that hooks to the battery. The battery is not a NiCad.
Here’s a summary of the NiteRider Digital Pro-12 Extreme after less than a week of use:
Good points:
- No headache charging system. You can’t overcharge the battery using the charger in the proper way. Plug it in and forget it–amazing. It’s really an improvement over the constant worrying with fiddling with the Pro-6 charger. You plug the charger into the taillight plug.
- You can’t over discharge the light, because it will turn off when it reaches that level.
- Doesn’t weigh much more than a Pro-6 system. The extra weight is the double lamp and the sturdier plugs.
- Charges faster than the Pro-6. Supposedly 9.5 hours for a full charge.
- Superior clamp that pops off and can be fully adjusted without a screwdriver.
- The taillight is brighter than the usual AAA/AA battery blinker lights and does not put significant drain on the battery.
- Variable the light settings between 6-9-12-20-32 watts, so if you really need it, you can do 32w, but can turn it lower and make it last longer.
- Has a flasher mode (even an SOS mode).
- Whole system comes off without tools (except the taillight seatpost anchor) fairly quickly. (This might be a bad thing in regard to theft if you leave it on and walk in a store.)
- The remote switch lets you monitor the battery level precisely.
Could be improved:
- If you’re going out for a daytime ride and don’t need the light, you can take only the battery off, but you’d have some dangling wires in the stem area.
- The remote switch is OK, but a little tricky to toggle between all the modes.
- They could come up with more compact or lighter battery scheme, but I don’t like my battery hanging around on the top tube either.
- I wish battery life was longer and find it hard to believe they can’t get a longer burn time on lights in general (not really a NiteRider thing. Seems like there’s been a lot of developments in fuel cell technology that haven’t made it to bike lights.)
Bad points:
- Costs a small fortune (about a monthly car payment)
by Bob VonMoss
Another Opinion
I have the Niterider Digital Pro12 Extreme and have found it to be a good overall light, the tail light’s a super eye catcher and I’m told it does not amount to a significant draw on the battery.
I never get less than 1 hour of run time even when using 32 watts (the highest setting). 32 watts of incandescent light is unfortunately not enough for me in some situations. I tend to roll fast (even at night in wintertime) and I want my light to push down the trail in front of me hopefully eliminating most every potential surprise.
Advantages:
- Smart charging system, plug it in and walk away.
- Two lamps. If one fails the other one turns on.
- Compact, detatchable.
Disadvantages:
- Expensive ($300.00+)
- Yellowish color light (typical of halogen lamps).
Daniel Servatius
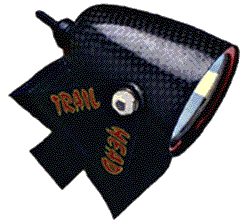
Trailhead Light
 I love helmet-mounted lights, and have always brewed my own. Nonetheless, I decided to splurge.
I recently purchased a helmet-mounted light from Trailhead Lights. I am delighted. The product can be viewed on the Trailhead website at. I purchased the simpler version (10 watt, on-off) rather than the dimmable “Brain” version. I also purchased the Maha smart charger which has been modified by Trailhead for the NiMH battery pack.
The MAHA is not only optimized for NiMH, but has a temperature sensor which can be inserted into the battery pack. From time to time you can run the “condition” mode, to perform a discharge/recharge cycle.
The lamp housing is carbon fiber, and is very light. The lamp itself is MR-16 form factor. I have installed the bracket on the top of the helmet, since my first try (closer to the front) made the toggle switch harder to operate. Located at the top there is no “tipping” effect on the helmet.
For the DIY enthusiast, Trailhead sells the light only, or the housing.
Four stars!
by Daniel R Herbert
Shimano Generator Hub
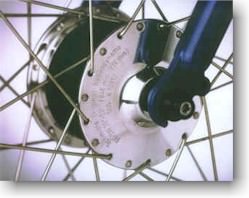 I took yesterday off, and built up two wheels using the Shimano NX-30 generator hub. These are on offer from Mike Barry at Bicycle Specialties at the killer price of CDN $95, including automatic switch and quick-release.
I installed one wheel on my wife’s commute bike, with a 3 watt Lumotec Oval (from Peter White). Since she uses a blinkie rear light, I didn’t bother with a taillight.
What a delight! Being used to homebrew lights ranging from 10 to 50 watts, I was skeptical about 3 watts. The Lumotec shows what can be done with a well-designed reflector and housing. Great light.
The hub resistance was negligible. The light reaches full brightness at a surprisingly slow speed (the wheel is a 559).
Also 4 stars!
(I have no affiliation with Trailhead, Shimano, Bicycle Specialties, or Peter White Cycles except as a satisfied customer.)
by Daniel R Herbert