
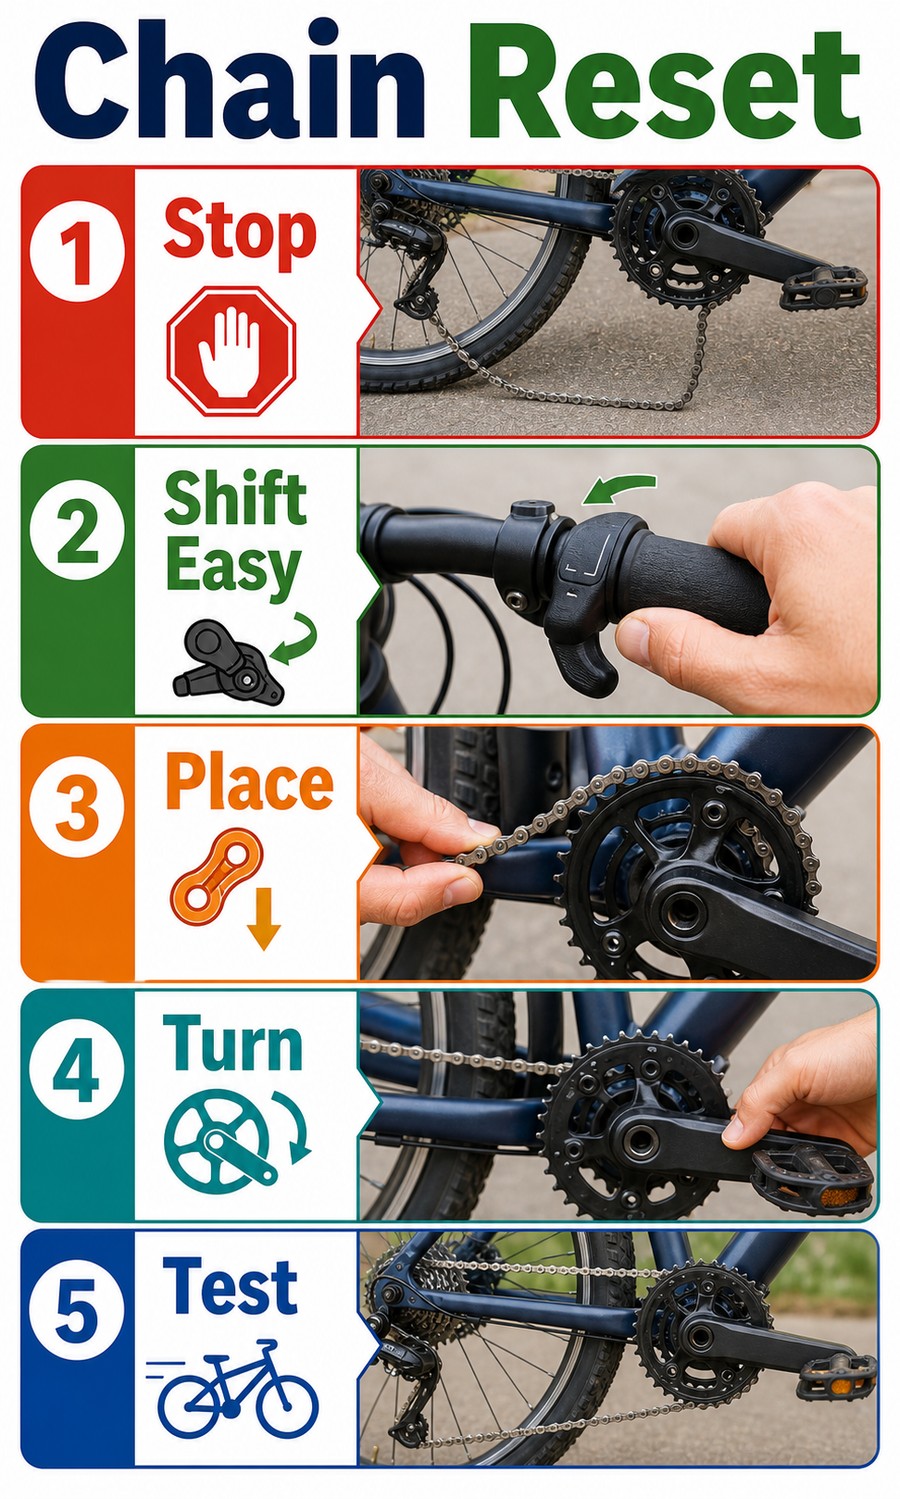
To put a chain back on a bike, stop in a safe place, shift to an easier gear if possible, place the chain on the bottom of the chainring, lift the rear wheel or roll the bike gently, and turn the pedals by hand until the chain seats. Do not pedal hard until you know why the chain came off. This guide is built for the rider who wants the practical answer first, then enough detail to avoid the common mistake. The goal is not to memorize bike-shop language. The goal is to make the next ride easier, safer, and less confusing.
The Fast Answer
To put a chain back on a bike, stop in a safe place, shift to an easier gear if possible, place the chain on the bottom of the chainring, lift the rear wheel or roll the bike gently, and turn the pedals by hand until the chain seats. Do not pedal hard until you know why the chain came off. If you remember only one thing, make the change before the bike is under stress. That might mean shifting before a hill, measuring before buying a child’s bike, opening a Presta valve before pumping, or stopping before a chain problem becomes a crash risk.
This topic has weak or scattered search results because many ranking pages answer only one version of the problem. Ahrefs showed Reddit, Instructables, and REI chain repair ranking. Icebike should beat them with emergency reset steps, prevention, stop rules, and links to chain repair and shifting pages. Icebike’s value is the decision process: what to check first, what to ignore, when to stop, and which related Icebike guide solves the next problem.
Decision Chart
Use this chart first. It turns the search query into a practical diagnosis instead of a generic list of tips.
| Situation | Likely answer | What to do |
|---|---|---|
| Chain fell to inside near frame | Shift front easier or handle gently | Avoid scratching frame |
| Chain fell outside chainring | Place on bottom teeth and rotate | Keep fingers clear |
| Rear derailleur looks twisted | Stop riding | Could enter spokes |
| Chain drops repeatedly | Adjustment or worn part | Diagnose before traffic |
| Chain is broken | Needs link/tool repair | Do not just place it back |
Visual Guide
The graphic below condenses the main decision path into a narrow-column visual for the article. Use it as the quick reminder, then use the tables and examples for the edge cases.
Step-By-Step Method
Start with the low-risk check, then move toward the fix. This order keeps a simple issue from turning into unnecessary parts, unsafe riding, or a confusing adjustment trail.
- Move out of traffic and stop the bike.
- Shift to an easier rear gear if the shifter still works.
- Place the chain on the bottom section of the chainring.
- Lift the rear wheel or roll the bike slowly while turning the pedals by hand.
- Pedal gently and test shifting before riding normally.
Work slowly and change one thing at a time. A beginner can usually learn the pattern in a few minutes, but the bike still needs a calm test area. Do not make the first test happen in fast traffic, on a steep hill, or with a child already frustrated.
Common Mistakes
Most problems in this topic happen because the rider skips the first check or copies advice from a different bike. Use this mistake table as a quick self-audit before replacing parts, buying the wrong size, or forcing a component.
| Mistake | Better choice |
|---|---|
| Pedaling hard immediately | Test gently because the chain may drop again. |
| Putting fingers between chain and teeth while cranking | Rotate slowly and keep fingers clear. |
| Ignoring a bent derailleur | Stop if it points toward the spokes. |
| Blaming the chain every time | Limit screws, chainline, worn parts, and shifting can cause drops. |
| Riding away with greasy hands on brakes | Clean hands before braking if possible. |
When To Stop And Fix The Bike First
Some issues are annoying. Others are stop-ride issues. If the problem affects braking, steering, chain control, tire security, helmet protection, or a child’s ability to stop, pause the ride and fix the setup before continuing.
- The chain is broken or twisted.
- The derailleur is bent toward the wheel.
- The chain jams between frame and chainring.
- The chain drops every time you shift.
This stop-rule section is part of the content moat for this batch. Many top results tell riders what to do when things go right. Icebike also needs to say when the rider should stop, inspect, resize, or ask a mechanic.
Real-World Examples
- If the chain drops inside the small ring during a front shift, the front derailleur limit may need adjustment.
- If the chain falls off after a bump, check chain tension, clutch setting if present, and drivetrain wear.
- If a child’s bike drops the chain often, chain tension or wheel position may be wrong.
These examples are deliberately plain. The reader should be able to recognize their own ride, garage, kid-bike setup, or commuter problem without translating a race mechanic’s instructions.
Troubleshooting Matrix
Use this second matrix when the first fix does not solve the problem. It is designed to stop the common loop where a rider repeats the same action, gets the same failure, and then assumes the whole bike is wrong.
| What still feels wrong | What it usually means | Next move |
|---|---|---|
| The problem returns immediately | The root cause was not fixed | Go back to the decision chart and isolate one variable |
| The bike works in the stand but not on the road | Load, rider weight, or real pedaling force changes the result | Test under gentle real riding before traffic |
| The fix works only once | A part may be worn, loose, mis-sized, or slipping | Inspect the related part before repeating the adjustment |
| The rider feels less confident after the change | The setup may be technically correct but wrong for current skill | Choose the safer beginner setting first |
| The issue appears after a new part | Compatibility or installation may be the problem | Compare the new part against the old size and setup |
The important detail is sequence. Start with the simplest observation, then move toward parts, measurements, or mechanic help. Guessing in the other direction wastes time and can make the bike less safe.
Beginner, Commuter, Kid, And Weekend Variations
The same advice changes slightly by rider. A confident adult on a quiet path can tolerate more trial and error than a child learning to stop, a commuter riding in traffic, or a rider fixing a problem at the roadside. Use the version that matches the ride, not the version that sounds most advanced.
| Rider type | Best version of the advice |
|---|---|
| New adult rider | Prioritize control, repeatable steps, and low-risk test rides |
| Daily commuter | Favor reliability, lights/traffic safety, and a setup that works when tired |
| Kid or family ride | Fit, stopping, and confidence matter more than speed or perfect efficiency |
| Weekend fitness rider | Use the guide to remove friction before longer rides |
| Roadside repair | Do only the safe temporary fix, then inspect properly at home |
This is one place Icebike can beat generic search results. Many competitor pages answer the ideal version of the question. Riders need the version that works with a nervous child, a dark commute, a loaded bike, or a repair made with cold hands.
What To Check After The First Ride
Do not judge the setup only while standing next to the bike. The first short ride tells you whether the advice held up under real weight, vibration, braking, and steering. Stop after five to ten minutes and inspect the part or fit point again.
- Recheck the exact part or fit point you changed.
- Look for movement, slipping, rubbing, noise, pressure loss, or renewed hesitation.
- Ask whether the bike feels calmer, not merely different.
- Confirm the rider can stop, steer, and restart confidently.
- Write down the setting, measurement, pressure, or adjustment that worked.
If the problem is still present after a careful first ride, do not keep adding random changes. Return to the tables above, isolate the next likely cause, and use the related Icebike guide for the deeper repair.
Tools, Fit, And Setup Checklist
The checklist changes slightly by topic, but the principle is the same: use the simplest reliable tool, verify the setup, and do not let one shortcut hide a bigger problem.
| Check | Why it matters |
|---|---|
| Identify the exact bike part or fit point | Prevents fixing the wrong problem |
| Use the correct tool or measurement | Reduces damage and guesswork |
| Make one change at a time | Shows what actually solved the issue |
| Test in a safe place | Keeps a small mistake from becoming a crash |
| Record the working setup | Makes the next ride faster to prepare |
How This Connects To Icebike’s Existing Guides
This article is not meant to stand alone. Use it as the entry point, then move to the deeper Icebike page that matches the next problem.
- how to fix a bike chain
- bike chain slipping
- why your bike will not shift gears
- bike chain length
- bike safety checklist
Sources And Evidence
Visible factual support for this guide comes from practical source material and Icebike’s related archive pages. Competitor pages were used for gap analysis only, not as public evidence.
Final Check Before You Ride
Before you call the setup done, run one short test in a low-risk place. The bike or child should feel calmer after the change. If the problem gets worse, undo the last change and return to the decision chart. If the issue affects control or safety, stop and repair it before riding in traffic.