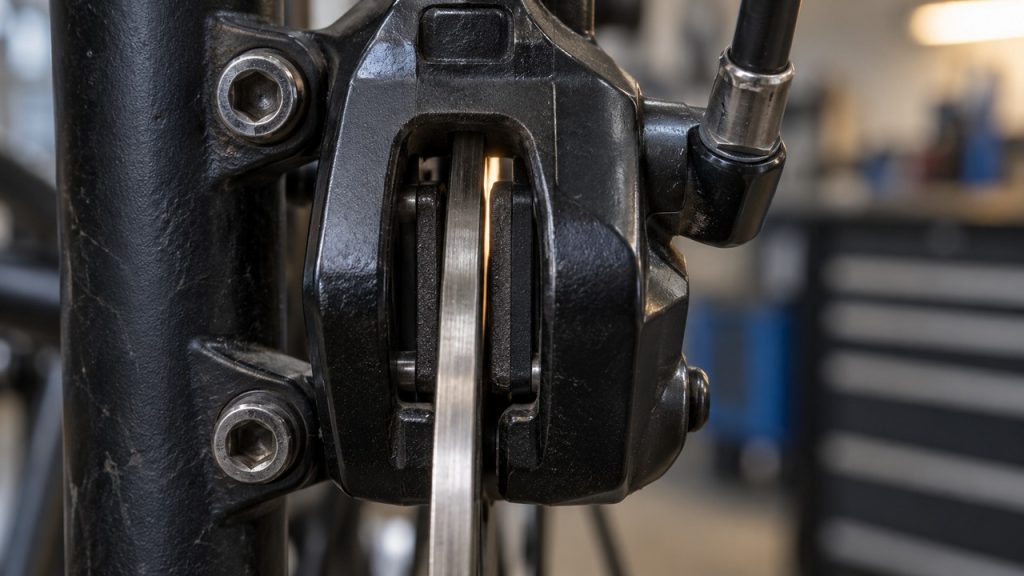
A disc brake that rubs all the way round has a caliper sitting off-center over the rotor; loosen the two caliper bolts, squeeze the lever and retighten them. If the rub comes and goes once per wheel turn, the rotor is bent in one spot and needs truing. If it started after you swapped wheels or fitted new pads, check that the axle is fully seated and that the pistons went all the way back before you touch anything else.
Squeal and squeak under braking are a separate problem: see why bike brakes squeak. Figures and quotes below come from Shimano, SRAM and Park Tool and are named where they appear; any other rule here is Icebike’s own reasoning from how the parts work.
Match the rub to the cause
Lift the wheel and spin it by hand. A steady hiss means constant contact; a “shh, shh” in time with the wheel means one spot on the rotor.
| What you notice | Likely cause | Quick check | Fix |
|---|---|---|---|
| Rubs all the way round, same sound the whole turn | Caliper off-center, or a wheel not fully seated | Backlight the caliper: one pad gap shows no light | Reseat the wheel, then center the caliper |
| Rubs on one side only | Caliper off-center; on hydraulics, one sticky piston | Squeeze the lever and release: does one pad stay out? | Center the caliper; if a pad stays out, reset the pistons |
| Rubs in one spot, once per wheel turn | Bent rotor, or a loose rotor | Watch the gap open and close as the rotor passes the pads | Tighten the rotor bolts or lockring, then true the rotor |
| Started after a wheel change | Axle not seated, or the new wheel holds its rotor in a different place | Reseat the wheel; if it still rubs, the rotor position differs | Center the caliper for that wheel |
| Started after a pad change | Pistons not fully pushed back, or caliper now off-center | Are both pistons flush and moving evenly? | Reset the pistons, pump the lever, then center the caliper |
| Hydraulic: both pads drag, often after the lever was squeezed with the wheel out or after a bleed | Pistons pushed out too far, or extra fluid in the system | The rotor won’t slide between the pads, or the pads won’t push back by hand | Reset the pistons with the reservoir open |
| Scraping or grinding after a wet or muddy ride | Grit or a stone between pad and rotor, or contaminated pads | Pull the wheel and look at the pad faces | Clean the rotor with isopropyl alcohol; replace oil-soaked pads |
| Rubs only when hot, after a long descent | Rotor moving out of true with heat | Let it cool fully and spin it again | If it runs clean when cold, change how you brake; if not, true or replace the rotor |
| Rubs only when you stand, sprint or corner hard | Flex: loose axle, hub bearing play, loose rotor or a flexy wheel | Rock the wheel side to side in the frame; check axle and rotor bolts | Tighten and fix play |
| Mechanical (cable) disc rubs on the inner pad | Fixed inner pad set too close, or caliper off-center | Back off the inner pad adjuster a quarter turn: does it stop? | Set the pads for your caliper type |
Find the contact point in two minutes
- Backlight the caliper. Hold a light or a sheet of paper behind it so you can see daylight on each side of the rotor. A side with no light is the side that touches.
- Spin and watch the gap. If one gap stays closed all the way round, the caliper sits off-center. If the gap opens and closes as the rotor passes, the rotor is bent at that spot.
- Rock the wheel and wiggle the rotor. A knock means hub bearing play; a rotor that moves on the hub has loose bolts or a loose lockring.
- Squeeze and release the lever. On a hydraulic brake, a pad that stays against the rotor points to a sticky piston.
Seat the wheel first: thru-axle vs quick release
Quick release. Open the lever, put the bike’s weight on the wheel so the axle seats at the top of both dropouts, then close it. Park Tool’s wording: “Apply downward pressure on the bike to ensure the frame and axle are in contact.” Shimano adds a caution for disc bikes: if the quick release lever sits on the same side as the rotor, confirm it does not interfere with the rotor.
Thru-axle. Tighten it to the torque printed on the axle or in the fork or frame manual. Our bike torque spec finder gives common starting ranges, and the number printed on the part wins.
Rub after swapping wheels. If the wheel is seated and the rub only appears with the second wheel, the two hubs hold their rotors a fraction of a millimeter apart. Center the caliper for the wheel you ride most, or ask a shop about rotor shims so both wheels line up.
How to center a disc brake caliper
Tool links on this page go to Amazon, and Icebike earns a commission on purchases through them. We linked Park Tool versions of tools this guide calls for, not picks from a hands-on test.
You need the key for the caliper bolts (hex, or T25 on SRAM) and a torque wrench.
- Loosen both caliper mounting bolts until the caliper slides side to side by hand. Don’t remove them.
- Squeeze the brake lever and hold it. On a hydraulic brake the pistons clamp the rotor and pull the caliper into line. SRAM’s manual says to squeeze lightly three times, then hold.
- While holding the lever, snug the two bolts a little at a time, alternating so the caliper doesn’t twist.
- Release the lever and spin the wheel. Look for light on both sides.
- If one pad still rubs, fine-tune by hand. Spin the wheel, loosen one bolt, and push the caliper toward the side of the pad that rubs: moving the caliper that way pulls the rubbing pad off the rotor. Park Tool’s instruction is to push the caliper “in the direction of the rub until there is a gap on either side of the rotor.” Snug the bolt. If that doesn’t clear it, try the other bolt.
- Tighten to the brake maker’s figure. Shimano gives 6-8 N·m for its caliper fixing screws, and SRAM’s MTB disc brake manual shows 9.5 N·m for its T25 caliper bolts.
- Squeeze the lever hard a few times and spin the wheel again; tightening can pull the caliper out of line.
Don’t add washers where the maker designed none, because the pads will no longer line up with the rotor. If no caliper position clears both pads, the frame or fork mounts may not be square to the rotor. Shimano’s manual notes that when the caliper mounting boss and the dropout are not parallel, the rotor and caliper may touch. A shop can face the mounts with a facing tool. Rim and cantilever brakes set up differently; our bike brake adjustment guide covers them.
Mechanical (cable) disc calipers
On most single-arm mechanical calipers the cable moves only the outer pad, and the rotor flexes over into the fixed inner pad, so squeezing the lever alone won’t center them. Follow Park Tool’s procedure for your caliper’s adjusters.
Inner pad adjuster only:
- Loosen the caliper mounting bolts so the caliper floats.
- Turn the inner pad adjuster all the way in (clockwise), then back it off about 1/4 turn.
- Pull and hold the brake lever, snug the caliper bolts, and release the lever.
- Back off the inner pad adjuster another 1/4 turn and spin the wheel.
With one adjuster, you can’t move the outer pad in as the pads wear. Park Tool says these calipers “will need to reset the caliper position from scratch as the pads wear.”
Inner and outer pad adjusters (two-knob calipers):
- Loosen the caliper mounting bolts so the caliper floats.
- Turn the outer pad adjuster all the way out (counterclockwise), then back in one full turn.
- Turn the inner pad adjuster clockwise until both pads lock against the rotor.
- Snug the caliper mounting bolts.
- Loosen both pad adjusters evenly, 1/4 to 1/2 turn, and spin the wheel.
Park Tool’s typical torque for mechanical calipers is about 6 N·m on the mounting bolts and 4 N·m on the cable pinch bolt. On a two-knob caliper, take up pad wear with the pad adjusters. Park Tool is direct about the barrel adjuster: “Do not use the barrel adjuster to move the pads inward as they wear.”
Reset sticky or overextended pistons (hydraulic)
Hydraulic pistons move out as the pads wear and stay there. Shimano’s manual says the brake “is designed to automatically adjust the gap between the disc brake rotor and the brake pads by the pistons gradually protruding in relation to the wear of the brake pads.” That’s why a hydraulic brake rubs when one piston sticks with dirt, or when someone squeezes the lever with the wheel out.
Shimano’s caliper piston maintenance, for pistons that “protrude unevenly” or pads that “remain in contact with the disc brake rotor”:
- Remove the wheel, then the pads.
- Clean the pistons and the area around them. Don’t remove the pistons.
- Push the pistons straight back as far as they go with a flat-shaped tool, without twisting them. Shimano: “Do not push the pistons with a sharp tool.” Do it with the oil funnel fitted to the lever, which protects the lever’s diaphragm.
- Refit the pads and the pad spacer.
- Squeeze the lever a few times and check that both pistons come out evenly. Repeat if they don’t.
- Remove the spacer, refit the wheel and spin it. If it still rubs, center the caliper.
SRAM’s pad manual does the push-back with the pads in place: a flat blade screwdriver between the pads presses the pistons flush. If the pistons won’t go back, Shimano says to remove the bleed screws and try again, with the note “(Note that some oil may overflow from the reservoir tank at this time.)” Pistons that refuse to retract after a bleed usually mean too much fluid went in. Keep a rag ready, keep the oil off the pads, and if it still drags, bleed the brake again to the maker’s procedure.
Shimano recommends fitting the pad spacer whenever the wheel is out, so a squeezed lever can’t push the pistons together.
True a bent rotor, and know when to replace it
Rule out a loose rotor and hub bearing play first, then true the rotor on the bike with the pads as your gauge.
How straight is straight enough?
Neither Shimano nor SRAM gives a lateral runout figure in the brake manuals we checked. Shimano’s rule is that a rotor that is “worn, cracked or warped” should be replaced. Park Tool’s alignment page sets the baseline: “It’s normal to have some lateral movement in your rotor as it spins.” Its rotor truing page gives three working standards:
- With a gauge on a truing stand, the rotor is “adequately true” when the deviation is “smaller than a business card.”
- With a dial indicator, a target of 0.2 mm (Park’s example).
- Without tools: “When the rotor is not rubbing the pads as it spins, it is adequately straight.”
Truing steps
- Turn the wheel by hand and mark the spot where the rotor touches a pad, or where the gap closes.
- Fit a rotor truing fork on the rotor at that spot and bend it away from the pad it touches. Start with light pressure and add more only if nothing changes.
- On a two-piece rotor (steel braking track on an alloy spider), bend only at the outer ring, never at the arms.
- Spin and repeat until the gap stays even or the rub stops.
- Wipe the braking track with isopropyl alcohol and a clean rag. Fingers leave oil, and Shimano warns that oil or grease on the rotor and pads “may prevent the brakes from operating.”
Replace the rotor if a few minutes of work brings no improvement, or if an impact bent it badly.
Rotor minimum thickness by maker
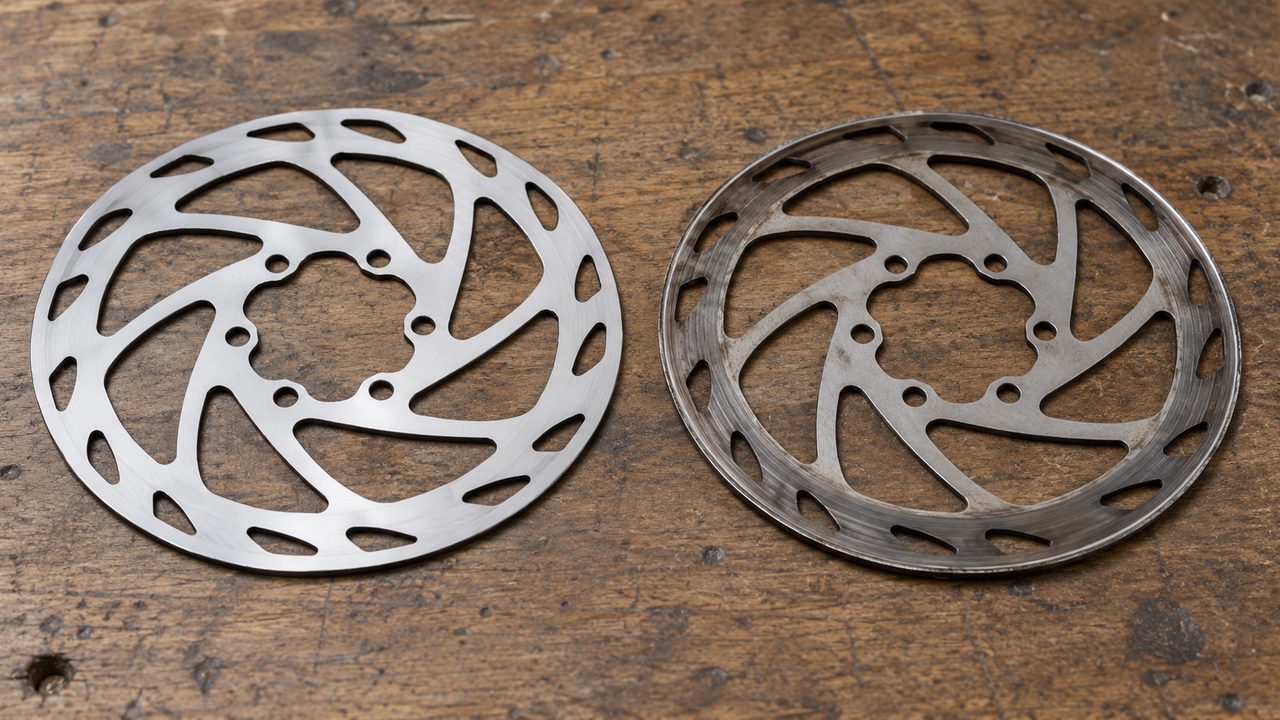
Measure the braking track at its thinnest point with a caliper or micrometer and compare it with the figure printed on the rotor or in this table.
| Maker and rotor | Replace when | Source |
|---|---|---|
| Shimano (MTB and road hydraulic disc brake dealer’s manuals checked) | 1.5 mm or less, or when the aluminum layer shows through | Shimano dealer’s manuals |
| SRAM 1.85 mm rotors (CenterLine, CenterLine X, Paceline, Paceline X) | Thinner than 1.55 mm | SRAM brake maintenance guide and user manual |
| SRAM 2 mm rotors (HS2) | Thinner than 1.7 mm | SRAM brake maintenance guide and user manual |
| Any other brand | The minimum stamped on the rotor | The rotor itself |
SRAM also tells riders to change the rotor when they change pad compound.
Rub after new pads
New pads are thicker than worn ones, so the pistons must go all the way back first; run the piston reset, then pump the lever until the pads firmly contact the rotor. A faint tick on new pads often fades after bed-in. Shimano’s procedure: ride at moderate speed, brake to walking pace with one brake at a time, and repeat at least 20 times for each brake. SRAM says “every time you install new brake pads and rotors, bed-in must be repeated.” To judge when the next set is due, our brake pad wear calculator estimates an inspection point from mileage, conditions and terrain.
Rub only when hot
A rotor that runs clean in the workshop and rubs after a long descent is moving out of true as it heats up, and the larger 180, 203 and 220 mm sizes are the most prone to warping (Shimano).
- If the rub disappears once the rotor cools, the rotor is fine. Brake harder for shorter spells instead of dragging the brake the whole way down.
- If the rub stays after the rotor cools, the heat bent it. True it or replace it, and check its thickness while it’s off.
Rub only when standing, sprinting or cornering
Quiet in the stand but rubbing under load means something moves. Check in this order:
- The axle. A thru-axle below its torque, or a quick release that isn’t firmly closed, lets the hub shift.
- Hub bearings. Rock the wheel side to side. Any knock is play that lets the rotor move.
- Rotor bolts or lockring. A loose rotor rocks on the hub.
- Wheel and frame flex. A light brush on a big rotor in a hard corner, with every bolt tight, is the wheel and frame flexing. Low spoke tension adds flex; see how to true a bike wheel.
Hydraulic vs mechanical: why they rub differently
| Hydraulic disc | Mechanical (cable) disc | |
|---|---|---|
| What moves the pads | Fluid pushes pistons on both sides (most designs) | The cable moves one arm; on most single-arm calipers only the outer pad moves |
| Pad wear adjustment | Automatic: the pistons creep out as pads wear | Manual: pad adjusters on two-knob calipers; a full reset on single-adjuster calipers |
| Usual rub cause | Caliper off-center, sticky piston, pistons pushed out with the wheel off | Inner pad set too close, caliper off-center, adjusters not reset for new pads |
| Centering method | Squeeze the lever and tighten the bolts | Set the pads by adjuster, then snug the bolts (steps above) |
When to stop riding
Light rub you hear only in a workstand, with the wheel spinning freely, can wait. Stop riding and fix it, or see a shop, if:
- The rotor is at or below its minimum thickness: 1.5 mm for Shimano, 1.55 mm or 1.7 mm for SRAM, or the figure stamped on it. Shimano warns that such a rotor “may break.”
- The rotor is cracked or deformed. Shimano’s instruction is to replace it.
- The pads are down to 0.5 mm of friction material (Shimano) or 3 mm total with the backing plate (SRAM).
- Oil, grease or brake fluid has reached the pads or rotor, or a hose or caliper is leaking. Shimano says not to use the brakes with oil leaking.
- The wheel slows to a stop on its own when you spin it, or the brake won’t let go after you release the lever. That’s drag; see bike brakes that won’t release.
- A caliper bolt, rotor bolt or axle is loose.
- The lever pulls further than usual or feels soft since the rub started.
Questions riders ask
Is a little disc brake rub normal?
Yes, within limits. Park Tool says “It’s normal to have some lateral movement in your rotor as it spins,” and treats a rotor as straight enough once it stops rubbing the pads. A faint tick when you spin the wheel by hand is fine. Rub you can hear while riding wears the pads and slows you, so center the caliper or true the rotor.
Why does my disc brake rub after I took the wheel off?
The axle didn’t seat in the same place, or the lever got squeezed with the wheel out. Reseat the wheel, then push the pistons back if the rotor won’t fit between the pads.
Can I true a rotor while it’s on the bike?
Yes. Use the pads as your gauge and a rotor truing fork, as in the truing steps.
Will disc brake rub wear out my rotor?
Light rub wears the pads first. Steady rub adds heat on every ride, and a rotor that runs hot for long spells can bend, so a rub you ignore can become a bent rotor. Check the rotor against its minimum thickness whenever you replace pads.
Sources
- Park Tool. Hydraulic Disc Brake Alignment (accessed October 15, 2026). Wheel seating with downward pressure, “normal to have some lateral movement”, lever-squeeze centering, fine-tune by pushing the caliper in the direction of the rub, no added washers, mount facing.
- Park Tool. Mechanical Disc Brake Alignment (accessed October 15, 2026). Single arm moves the outer pad; inner-adjuster-only and inner-and-outer-adjuster procedures; single-adjuster calipers reset as pads wear; pad adjusters, not the barrel adjuster; about 6 Nm and 4 Nm.
- Park Tool. Disc Brake Rotor Truing (accessed October 15, 2026). Business-card and 0.2 mm example standards, “not rubbing” standard, truing on the bike with the pads as reference, light effort first, two-piece rotors at the outer perimeter, replace if no improvement or badly bent.
- Park Tool. Disc Brake Pad Removal and Installation (accessed October 15, 2026). Retract pistons before new pads, pump the lever until the pads contact the rotor.
- Park Tool videos: How to Align a Hydraulic Disc Brake on a Bike and How to True a Bicycle Disc Brake Rotor, YouTube (titles and author confirmed by oEmbed, October 15, 2026).
- Shimano. Dealer’s Manual DM-MADBR01-06, Hydraulic Disc Brake (MTB) (read October 15, 2026). Rotor 1.5 mm or less or aluminum visible, pads 0.5 mm, larger rotors warp more, mounting boss and dropout not parallel, quick release on the rotor side, pad spacers, piston push-back and caliper piston maintenance, oil funnel, bleed screws, 6-8 N·m, bed-in 20 times, oil on pads or rotor, oil leaks.
- Shimano. Dealer’s Manual DM-RADBR01-11, Hydraulic Disc Brake / Dual Control Lever (road) (read October 15, 2026). Same 1.5 mm rotor and 0.5 mm pad limits and 6-8 N·m caliper fixing screws for road calipers.
- SRAM. Brake Maintenance Guide (accessed October 15, 2026). Rotor minimums 1.55 mm (1.85 mm rotors) and 1.7 mm (2 mm rotors) with rotor names, pads at 3 mm total, bed-in after new pads and rotors.
- SRAM. MTB Disc Brakes and Shifters User Manual, 95-5018-019-100 Rev M (2023, read October 15, 2026). Caliper centering (squeeze three times and hold), 9.5 N·m caliper bolts, rotor wear limits, change rotors with pad compound.
- SRAM. Disc Brake Pads User Manual, 95-5018-018-000 Rev A (read October 15, 2026). Pads below 3 mm total, rotor below 1.55 mm, pushing the pistons flush with a flat blade screwdriver between the pads.