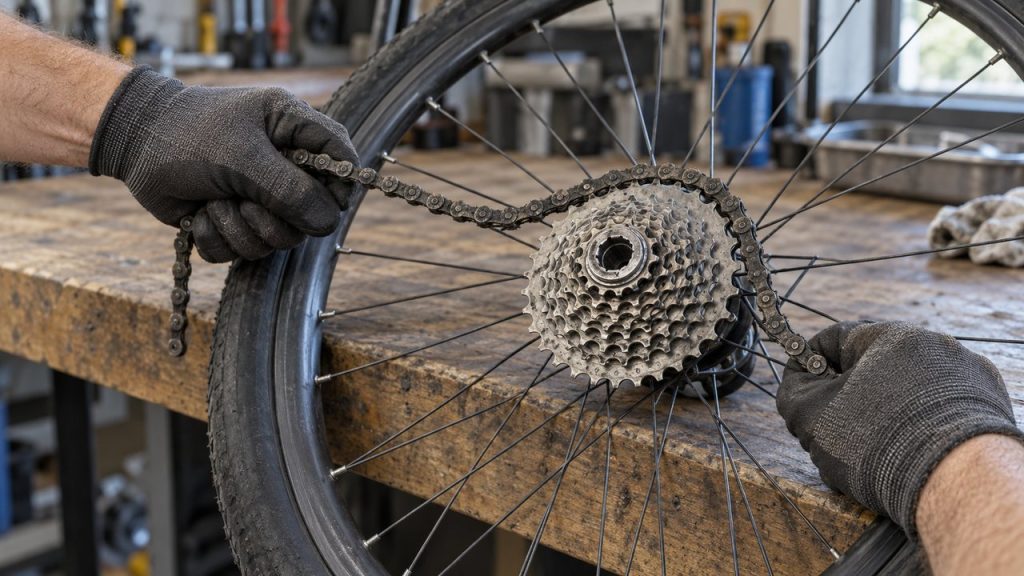
You can take a cassette off without a chain whip, but you can’t take it off safely without a lockring tool. A length of old chain wrapped around a big cog holds the cassette as well as a chain whip does. The splined lockring needs a 12-spline tool, such as Park Tool’s FR-5.2 ($10.95 list) or Shimano’s TL-LR15, turned with an adjustable wrench. A threaded freewheel needs its own remover ($9.95 list for Park’s FR-1.3), or you destroy the freewheel to get it off.
Many “no tool” guides and videos tell you to attack the lockring with pliers, a screwdriver or a hammer. Those can round off its splines, slip into the spokes, and turn a $10 job into a new lockring or a damaged freehub. The tables below show which system your wheel has, what each improvised method replaces, and what it can break.
Cassette or freewheel? Check before you buy anything
Spin the cogs backward and watch the splined ring in the middle. If those splines turn with the cogs, you have a cassette on a freehub. If they stay still while the cogs spin, you have a threaded freewheel. Freewheels usually carry 5 to 7 cogs, and Park Tool notes they turn up on older bikes, lower-end bikes and many e-bikes.
| What you have | How to spot it | What removes it | Can you skip the special tool? |
|---|---|---|---|
| Shimano or SRAM cassette with a lockring | A ring with 12 internal splines, about 23.4 mm across, on the face of the smallest cog. The splines turn with the cogs when you spin them backward. | Park FR-5.2 or FR-5.2G, or Shimano TL-LR15 or TL-LR10, plus an adjustable wrench and a chain whip | The chain whip, yes: use an old chain. The lockring tool, no. |
| SRAM XD cassette | No separate lockring. The 12 splines sit inside the smallest sprocket, and the whole stack comes off as one piece. | The same FR-5.2 family, a wrench and a chain whip | Same as above: improvise the whip, buy the tool. |
| Campagnolo cassette | A 12-spline lockring about 22.8 mm across, a little smaller than Shimano’s | Park BBT-5/FR-11 or Campagnolo’s own tool | No. Park Tool lists a separate tool for Campagnolo lockrings. |
| Older freehub with no lockring | No notches or splines next to the axle, a dust cap on the right side. The smallest cog threads on and does the lockring’s job. | Two chain whips | Yes. Two pieces of old chain replace both whips (steps below). |
| Threaded freewheel | Splines or notches in the center stay still when you spin the cogs backward. The whole cluster screws onto a thread on the hub. | A remover matched to the brand, such as Park FR-1.3 for Shimano, SunRace and Sachs freewheels | Only by taking the freewheel apart, which destroys it. |
A thru-axle wheel has no quick-release skewer to hold a plain FR-5.2 in the lockring, so the tool can tilt out of the splines under load. Park Tool lists its guide-pin FR-5.2GT ($16.95 list) as compatible with thru-axle hubs. With a plain tool, keep it fully seated and square to the lockring as you turn.

What works without the special tool, and what it can break
Improvise the part that holds the cassette and buy the part that turns the lockring. Shimano specifies 30-50 N·m (22-37 ft-lb) for its road cassette lockrings, so a lockring tightened to spec takes a firm push to break loose. Pliers or a screwdriver turned like a wrench can’t carry that load through 12 shallow splines without slipping. A punch or screwdriver tapped with a hammer is different: the shock can break a lockring loose, at the cost of the splines it hits.
| Method | Replaces | Does it work? | What it risks | Verdict |
|---|---|---|---|---|
| Old chain wrapped on a large cog, free end held in a gloved hand | Chain whip | Yes | The chain slips and your knuckles hit the cog teeth | Use it |
| Old chain with both ends clamped in locking pliers as a handle | Chain whip | Yes, with more leverage | The pliers slide off the chain if you don’t clamp them tight | Best no-tool whip |
| Old chain bolted to a strip of wood or flat bar | Chain whip | Yes. You’ve built a chain whip. | Little, if the bolts are tight | Build one if you’ll do this again |
| Pipe wrench or locking pliers clamped on a cog | Chain whip | Yes | Bent or scarred cog teeth where the jaws bite | Only on a cassette you’re throwing away |
| Needle-nose or slip-joint pliers in the lockring splines | Lockring tool | Only on a lockring that is already loose | Rounded splines, pliers jaws slipping into the spokes | Don’t |
| Adjustable wrench or locking pliers on the lockring’s outer edge | Lockring tool | No. The lockring has no flats to grip. | Scarred lockring and smallest cog | Don’t |
| Flat screwdriver or punch tapped with a hammer against one spline | Lockring tool | It can shock the lockring loose | Chewed lockring, a slip into the spokes or the freehub seal, a cut hand | Last resort; plan on buying a new lockring |
| Bench vise gripping a freewheel remover | Your wrench (freewheels) | Yes. Sheldon Brown calls it the usual way to remove a freewheel. | None, but you still need the remover | Use it if you own a vise |
| Taking a freewheel apart with a punch and hammer | Freewheel remover | Yes. Park Tool documents the method. | The freewheel ends up as scrap | Only when you’re replacing the freewheel |
Can you remove a cassette with pliers?
Only if the lockring is already loose. The top Google result for this search, a video, with about 1.5 million views, shows needle-nose pliers spinning a lockring off while a hand holds the cassette. Before that, the creator works on the lockring with a screwdriver and hammer while a pipe wrench and locking pliers hold a cog. He also says on camera that he had already loosened the lockring for the video. A lockring at 30-50 N·m won’t turn that way: pliers tips sit in two of 12 shallow splines on a 23.4 mm ring and cam out before the threads let go.
Skip every improvised lockring method if the splines are already chewed from an earlier attempt. A real tool may not bite either, and that wheel belongs at a shop.
How to remove a cassette using an old chain
You need the lockring tool for your system, an adjustable wrench (or a 1 in socket and handle), gloves, and an old chain or a piece of one. The piece has to wrap halfway around a large cog and leave a tail you can grab. If you need to cut a section off a worn chain, our guide to fixing a bike chain shows how to push a pin out with a chain tool.
- Shift to the smallest cog, then take the rear wheel off the bike. Put on gloves: worn cassette teeth cut skin.
- Remove the quick-release skewer and seat the lockring tool all the way into the splines.
- On a quick-release wheel, slide the skewer back through the hub and snug its nut against the tool. Park Tool uses the skewer to keep the tool from walking out under load.
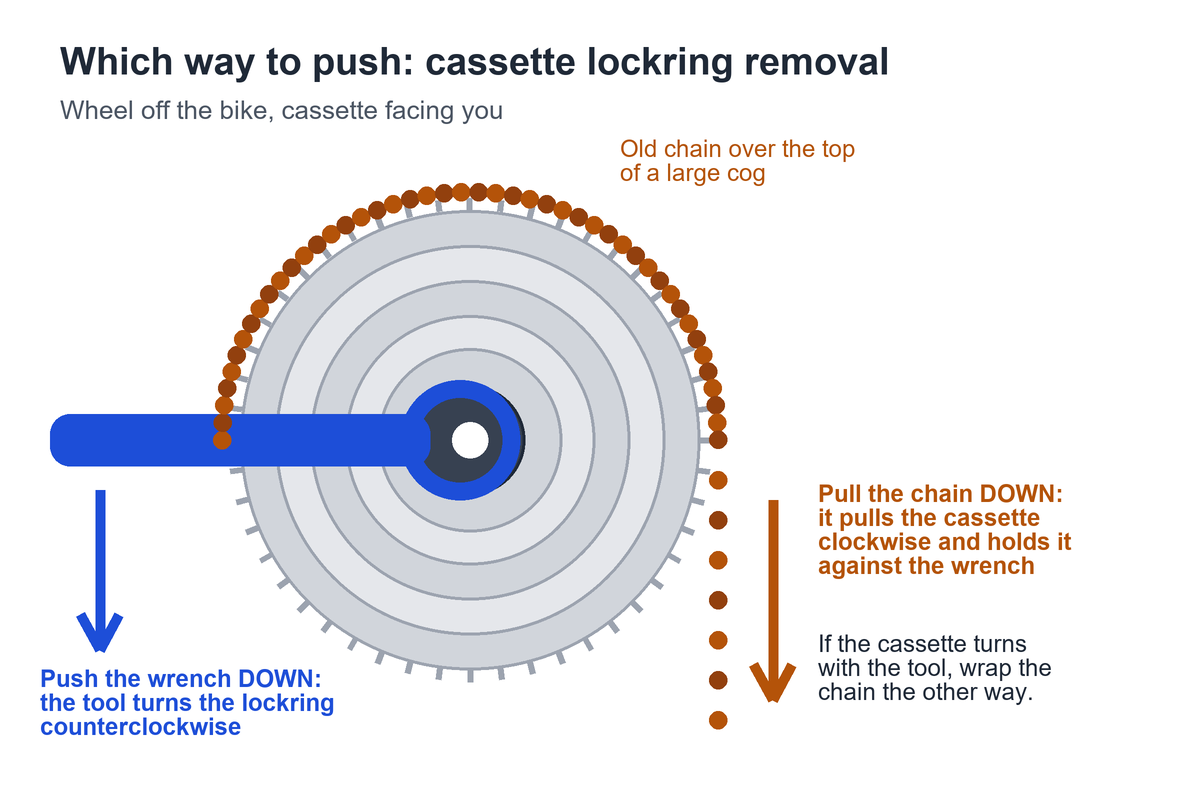
- Drape the old chain over the top of one of the larger cogs so the free end hangs down on the right, as in the diagram. Pulling that end down turns the cassette clockwise, the direction it turns when you pedal.
- Fit the wrench to the tool’s flats with the handle pointing left. Push the wrench handle down while you pull the chain down. The tool turns counterclockwise and the chain stops the cassette from following it.
- Expect a hard push and a loud crack or ratchet as the lockring lets go. Park Tool says that noise is the lockring’s locking teeth separating.
- Once the lockring breaks loose, remove the skewer and unthread the lockring by hand.
- Lay the wheel flat with the cassette up and lift the cogs off one at a time. Keep them, and any spacers, in order and the same way up.
If the tool turns and the cassette turns with it, you draped the chain the wrong way. Move the free end to the other side of the cog.
Taking the cassette off because the chain skips? Check the chain first. Our chain wear replacement estimator tells you when your chain is due and what to measure before you blame the cassette, and the bike chain slipping guide separates cassette wear from a derailleur that needs adjusting.
The one cassette you can remove with no special tool
Older freehubs without a lockring hold the stack with a threaded smallest cog, and that cog unscrews with two chain whips. Park Tool’s method sets the two whips in a “V”: one holds a larger cog, and the other turns the smallest cog counterclockwise to loosen it. Two pieces of old chain, each clamped in locking pliers, do the same job. To refit, thread the smallest cog back on and tighten it clockwise the same way.
Skip this section if you can see 12 splines in the center of the smallest cog. That’s a lockring, and it needs the tool.
How to remove a freewheel, with or without the remover
Pedaling tightens a freewheel onto the hub thread, so expect one that has been ridden for years to be tight. The remover has to match the freewheel: Park’s FR-1.3 fits Shimano, SunRace and Sachs, while Falcon freewheels take the FR-7. Park calls the two fittings similar but distinct and warns against using one tool on the other freewheel.
- Take the wheel off and remove the skewer or axle nuts.
- Seat the remover in the freewheel’s splines or notches. On a quick-release wheel, refit the skewer and snug the nut against the remover.
- Turn the remover counterclockwise with a large wrench. After one full turn, remove the skewer so it doesn’t jam against the tool.
- Keep turning counterclockwise until the freewheel spins off by hand.
With a bench vise, clamp the remover’s flats in the jaws, set the freewheel onto it, and unscrew the wheel from the freewheel instead of turning the tool. The rim gives you more leverage than any wrench.
Without a remover, Park Tool’s destructive method takes the freewheel apart. You tap the bearing cone on the face of the freewheel clockwise with a punch and hammer (it has a left-hand thread), lift off the outer body as the ball bearings, pawls and springs fall out, then clamp the inner body’s two flats in a vise and turn the wheel counterclockwise. Wear safety glasses when you hammer on steel. Park Tool calls reassembly very difficult and replaces the freewheel, so use this method only when a new one is going on.
Skip the remover if the notches are narrow and shallow. Park Tool warns that a tool in those notches can ruin both the freewheel and the tool, and it points riders with such freewheels to the destructive method.
Putting it back: torque and the tool you don’t need
Reinstalling is easier than removal. Grease the lockring threads, line up the one wide spline on each cog with the wide gap on the freehub, and tighten the lockring clockwise. Park Tool skips the chain whip for this step; the freehub engages in the tightening direction and holds the cassette.
| System | Lockring torque | Source |
|---|---|---|
| Shimano lockring cassettes | 30-50 N·m (22-37 ft-lb) for CS-R9200-12, CS-R8100-12, CS-R7100-12, CS-R9100, CS-R8000, CS-HG800-11, CS-R7000 and CS-HG700-11, with TL-LR10 or TL-LR15. Park lists 29.4-49 N·m for Shimano. | Shimano DM-TORQUE-00; Park Tool torque chart |
| SRAM cassettes, including XD | 40 N·m (30 ft-lb) | Park Tool torque chart and cassette guide |
| Campagnolo cassettes | 50 N·m (37 ft-lb), with the Campagnolo-pattern tool | Park Tool torque chart |
| Threaded freewheel | No torque figure. Thread it on by hand until snug, and pedaling tightens it. | Park Tool, Sheldon Brown |
For Shimano and SRAM, 40 N·m sits within both makers’ published ranges; Campagnolo wants 50 N·m. Without a torque wrench, 40 N·m works out to about 35 lb (16 kg) of push at the end of a 10 in (25 cm) wrench handle, and 50 N·m to about 44 lb (20 kg). After a cassette swap, check the rear derailleur adjustment before you ride. If the new cassette has a bigger largest cog, run the numbers in our derailleur capacity calculator, then size the chain with our bike chain length guide.
Skip the teardown if you’re pulling the cassette to fit more gears. Moving from a 7-speed cassette to 11 or 12 speeds also means new shifters, a new derailleur and a narrower chain, and often a new freehub body or wheel, so check compatibility before you strip the old one.
Buy the tool, or take it to a shop?
Buy the tool if you plan to remove the cassette even once more. Park Tool list prices in October 2026: FR-5.2 $10.95, guide-pin FR-5.2G $12.95, thru-axle FR-5.2GT $16.95, and the FR-1.3 freewheel remover $9.95. Add an adjustable wrench and an old chain, and a full cassette kit costs $11 to $17.
Need it once? Many bike co-ops and community workshops let you use their lockring tool and chain whip on site, and a friend who rides may own both.
Take the wheel to a shop instead when:
- A lockring or freewheel has already been damaged by pliers, a screwdriver or a punch.
- The freewheel has shallow notches, or it’s an old design Park Tool makes no remover for, such as the French Maillard 24-spline.
- The lockring hasn’t moved after a hard two-handed push with the tool seated and held square. More force on a misaligned tool strips splines.
- You don’t know which system you have after the spin test above.
Sources
- Park Tool. Cassette Removal and Installation (accessed October 14, 2026). Lockring tools and diameters, freewheels on older, lower-end and many e-bikes, skewer retention, removal and installation steps, SRAM XD at about 40 N·m, FR-5.2GT for thru-axle hubs, non-lockring freehubs.
- Park Tool. Torque Specifications and Concepts (accessed October 14, 2026). Cassette lockring torque: Shimano 29.4-49 N·m, SRAM 40 N·m, Campagnolo 50 N·m.
- Park Tool. Freewheel Removal and Installation (accessed October 14, 2026). Remover by brand, removal steps, shallow-notch warning, unsupported designs.
- Park Tool. Freewheel: Destructive Removal (accessed October 14, 2026).
- Shimano. Dealer’s Manual DM-TORQUE-00, Torque Chart. Cassette lockring torque and tools for current Shimano road cassettes.
- Sheldon Brown. Freewheel or cassette? Spin test for telling the two apart.
- Sheldon Brown. Freewheels. Vise removal method and why pedaling tightens a freewheel.
- flyfreak23. How to Remove Bike Cassette Without Special Tools (IMPROVED), YouTube. The pliers demonstration discussed above.